These recipes are fun surprises, and one batch will not be enough. This is a curated list of 17 red velvet brownie recipes plus some bonus twists that you're not ready for.
Don't lose this article. Enter your email below, and I'll send it to you right now. Plus a little encouragement and inspiration from me, straight to your inbox.
This is perfect for home bakers who want something a little more special than that standard brownie, and red velvet brings in cocoa depth and a signature color that is going to make you stand out! These aren't brownies with food coloring… no, no, these are melt-in-your-mouth delicious. Let's get into it.

Five simple dinners. One grocery list.
No recipe hunting, no messy shopping notes, no complicated chef projects. Just family dinners that fit real weeks.
1) Classic Red Velvet Brownies

The classic red velvet brownies are simple, bold, and reliable. Red velvet is made by mixing cocoa and red food coloring in an acid consisting of vinegar and buttermilk for a color reaction. That brownie texture relies on a fat ratio: butter-heavy gives you fudgy, flour-heavy gives you cakey. Red velvet traditionally uses a natural cocoa that affects the color and the flavor.
A common mistake with these is overbaking them. Brownies firm up after pulling them from the oven, so you want to pull early every single time. As for topping, cream cheese is the classic pairing, as it will cut the richness and give a nod to the red velvet cake heritage.
Classic Red Velvet Brownies
Ingredients
Method
- Preheat the oven to 350°F and line an 8x8 pan with parchment.
- Whisk the melted butter and sugar together until smooth.
- Beat in the eggs, vanilla, and red food coloring.
- Fold in the flour and cocoa just until combined.
- Spread the batter into the pan and bake for 26 to 28 minutes.
- Cool before slicing into squares.
Notes
2) Red Velvet Swirl Cheesecake Brownies

These red velvet swirl cheesecake brownies have a pink and white marble top that looks so good, everyone's gonna want to eat it. Red velvet is again cocoa, red food coloring, and buttermilk, not just chocolate. The swirl technique involves dropping cheesecake powder onto the brownie base and then using a toothpick to make figure-eights.
That color contrast is key. If you do too much mixing, it will lose the marble effect, so you want that cream cheese layer to be fully softened or it's not going to swirl smoothly. A common mistake is overbaking these. Brownies continue cooking out of the oven, so be sure to pull these ones early.
Red Velvet Swirl Cheesecake Brownies
Ingredients
Method
- Preheat the oven to 350°F and line a pan with parchment.
- Make the red velvet batter by whisking butter, sugar, eggs, coloring, flour, and cocoa.
- Beat the cream cheese with the extra sugar until smooth.
- Spread the red batter in the pan and dollop the cheesecake mixture over it.
- Swirl the two together with a knife.
- Bake for 32 to 35 minutes, then chill before slicing.
Notes
3) Cream Cheese Frosted Red Velvet Brownies

These cream cheese-frosted red velvet brownies have a classic pairing of tangy cream cheese that cuts the sweetness of this dense brownie base. Cream cheese frosting is simply made out of cream cheese, butter, powdered sugar, and vanilla. That ratio matters for your spreadability, so be really careful with that.
If you use cold cream cheese, you'll get lumps, so make sure it is fully at room temperature before you mix this up. Your brownies must cool completely before frosting, or it's going to melt and slide right off the top, and you don't want that. A thicker brownie base than cake means the frosting layer can go a lot heavier without being overpowering.
Cream Cheese Frosted Red Velvet Brownies
Ingredients
Method
- Bake the red velvet brownie batter at 350°F for 26 to 28 minutes, then cool completely.
- Beat the cream cheese until smooth and fluffy.
- Gradually add the powdered sugar and beat into a thick frosting.
- Spread the frosting evenly over the cooled brownies.
- Chill briefly to firm up the frosting.
- Slice into squares and serve.
Notes
4) Gluten-Free Red Velvet Brownies

These delicious gluten-free brownies are a great option for those with a gluten intolerance who want brownies that taste just like the real thing. The red velvet flavor comes from mixing cocoa, vanilla, and a slight tang from buttermilk or vinegar. It's not just food coloring. The gluten-free swap is using almond flour or a gluten-free blend. Almond flour gives you a fudgier texture, and the blends give more of a traditional crumb, so that comes down to preference. Your red color comes from gel food coloring, which will hold better than liquid in gluten-free batters that can be a little bit wetter.
A common mistake with this one is overbaking. Gluten-free brownies firm up as they cool, so be sure to pull them early. You can do a cream cheese swirl or frosting as a traditional red velvet pairing, and it works perfectly here.
Gluten-Free Red Velvet Brownies
Ingredients
Method
- Preheat the oven to 350°F and line a pan with parchment.
- Whisk the butter and sugar, then beat in the eggs, vanilla, and red coloring.
- Fold in the almond flour and cocoa until you have a thick batter.
- Spread the batter evenly into the pan.
- Bake for 26 to 28 minutes until set at the edges.
- Cool fully before slicing so they hold together.
Notes
5) Vegan Red Velvet Brownies

These vegan red velvet brownies are so rich that you would never guess that they're egg-free and dairy-free. Flax or chia eggs bind like real eggs, and you're not gonna believe it. The cocoa and red food coloring or beet powder give you a classic red velvet. Beet powder also adds a subtle earthiness to this that your vegan friends may enjoy.
Vegan butter or coconut oil swaps in for your dairy butter. Coconut oil gives you a little bit more flavor, so play around with which one you prefer. Plant milk such as oat, almond, or soy works in equal measure. Soy is the closest in protein content to dairy, but again this is something you can play around with. A common pitfall with this one is over-baking them. Vegan brownies are going to firm up more on cooling than egg-based ones, so pull them before you think they're ready.
Vegan Red Velvet Brownies
Ingredients
Method
- Preheat the oven to 350°F and line a pan with parchment.
- Whisk the coconut oil, sugar, and applesauce until smooth.
- Stir in the vanilla and red coloring.
- Fold in the flour and cocoa to form a thick batter.
- Spread into the pan and bake for 26 to 28 minutes.
- Cool completely before slicing.
Notes
6) Red Velvet Brookies

This recipe combines cookies and brownies in every single bite. A brookie is simply brownie batter and cookie dough layered or swirled in one pan. Red velvet is a cocoa-based batter tinted deep red and typically paired with cream cheese.
Brownie and cookie doughs have very different bake times and temps, so underbaking these brookies risks you having raw dough, and overbaking them dries out the cookie layer. You really need to find that happy medium here.
The red velvet flavor is a mild chocolate, and it's mostly a color thing that gets people intrigued. Using Dutch-processed cocoa compared to natural cocoa is something that will affect both your color and taste, so as the baker, you need to decide what to go with there.
A popular shortcut is to use boxed red velvet cake mix for the brownie layer and then do the chocolate chip cookie dough on top.
Red Velvet Brookies
Ingredients
Method
- Preheat the oven to 350°F and line a pan with parchment.
- Make the red velvet brownie batter and spread it into the pan.
- Break the cookie dough into pieces and scatter it over the top.
- Gently press the dough so it nestles into the batter.
- Bake for 30 to 32 minutes until the cookie layer is golden.
- Cool before slicing into squares.
Notes
7) White Chocolate Red Velvet Brownies

These white chocolate red velvet brownies are the perfect way to blend white chocolate and a deep red base into a dreamy combo that you're going to want to make again and again. White chocolate is simply cocoa butter, sugar, and milk solids. There are no cocoa solids, so it's very sweet and creamy. Red velvet's color traditionally comes from cocoa and an acidic buttermilk reaction, though modern recipes use red food dye.
It comes down to texture whether you get a brownie or a cake. A fat-to-flour ratio is key: if you have more butter and chocolate, you'll end up with a fudgier brownie, which is exactly what you want here. Keep in mind that white chocolate can scorch easily, so you want to cook it on low heat.
The flavor contrast with this one matters too. White chocolate's sweetness needs balance, and that tang from the cream cheese or that cocoa bitterness is going to help.
White Chocolate Red Velvet Brownies
Ingredients
Method
- Preheat the oven to 350°F and line a pan with parchment.
- Make the red velvet batter and fold in half the white chocolate chips.
- Spread the batter into the pan.
- Bake for 26 to 28 minutes until set.
- Melt the remaining white chocolate and drizzle over the warm brownies.
- Cool before slicing.
Notes
8) Nutella Red Velvet Brownies

This is the sweet treat you didn't know you needed, and it is one of the best flavor combinations out there. Nutella is a hazelnut cocoa spread that pairs well with red velvet's mild chocolate-vanilla base. Red velvet gets its color from cocoa and acidic ingredients from buttermilk or vinegar reacting with red dye or a natural beet pigment.
Nutella adds fat and sweetness, which can replace some butter and sugar in brownie recipes. Just keep in mind that Nutella's sugar content can make your edges over-crispy if over-baked, so try to avoid that. This is a popular combo in home baking, giving you a fudgy result when Nutella is swirled into the batter instead of layered.
Don't lose this article. Enter your email below, and I'll send it to you right now. Plus a little encouragement and inspiration from me, straight to your inbox.
Nutella Red Velvet Brownies
Ingredients
Method
- Preheat the oven to 350°F and line a pan with parchment.
- Make the red velvet brownie batter and spread it into the pan.
- Warm the hazelnut spread slightly so it's pourable.
- Dollop it over the batter and swirl it through with a knife.
- Bake for 28 to 30 minutes until set.
- Cool before slicing into squares.
Notes
9) Red Velvet Truffle Brownies

Yum, did somebody say red velvet truffle brownies? These ones are rich, extravagant brownies evoking the experience of biting into a gourmet chocolate truffle. Red velvet is simply cocoa, red food coloring, and buttermilk with vinegar, which is very distinct from plain chocolate, and that subtle flavor difference matters for this recipe. Truffle here refers to the texture and richness, not actual ganache truffles.
Brownie truffle hybrids typically have a high fat-to-flour ratio, which gives them a dense, fudgy interior, and that technique is what makes this recipe stand out. Extravagant signals premium ingredients, which means you're going to be using Dutch-processed cocoa, quality chocolate, and a cream cheese swirl to finish these off.
Red Velvet Truffle Brownies
Ingredients
Method
- Preheat the oven to 350°F and line a pan with parchment.
- Whisk the butter, sugar, and eggs until thick and glossy.
- Fold in the flour, cocoa, and red coloring.
- Stir in the dark chocolate chips.
- Spread into the pan and bake for 30 to 32 minutes until just set.
- Cool fully, then chill briefly for a dense truffle texture.
Notes
10) Peanut Butter Red Velvet Brownies
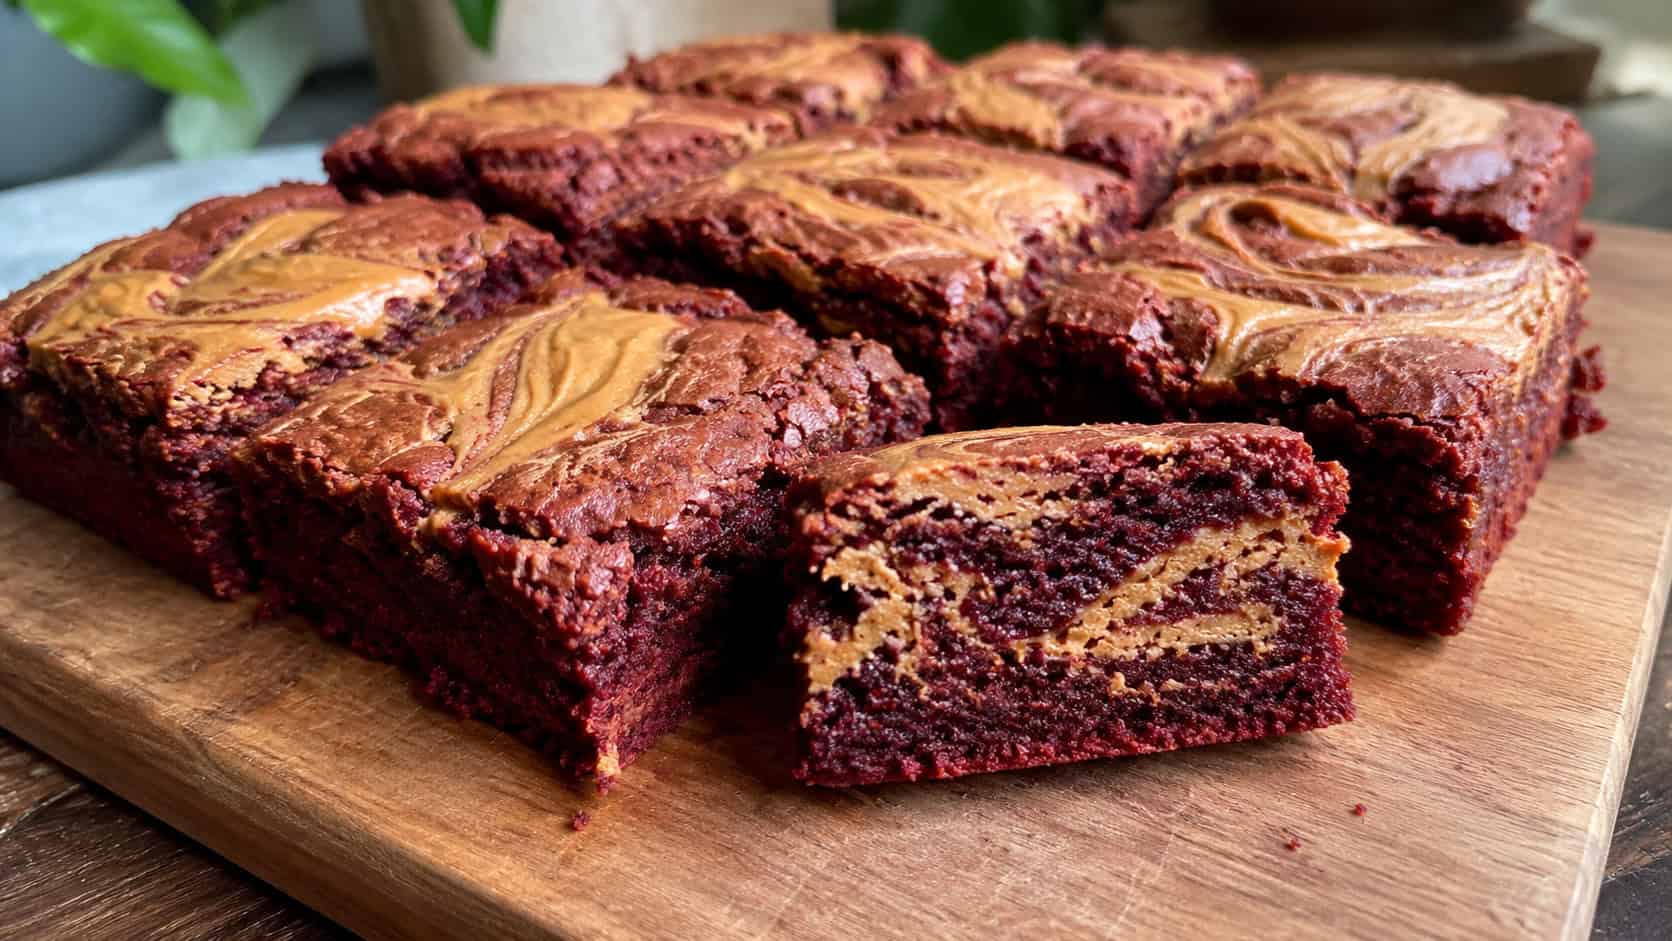
This recipe offers an impressive flavor combination you won't want to miss. Red velvet's signature is cocoa, red food coloring, and buttermilk and vinegar for a slight tang and tender crumb. The peanut butter swirl is added in before baking. You're simply going to throw in a dollop and drag it around with a toothpick or a knife, giving these a marbled effect.
Your fat balance matters with this recipe. Peanut butter adds oil, so the brownie base may need less butter to avoid a greasy texture. Cream cheese is another common addition because it pairs naturally with red velvet and peanut butter and gives you a richness to these brownies that is going to make them really special.
A common mistake is over baking. These run dense and fudgy, not cakey, so you want to pull them early and trust that toothpick.
Peanut Butter Red Velvet Brownies
Ingredients
Method
- Preheat the oven to 350°F and line a pan with parchment.
- Make the red velvet brownie batter and spread it into the pan.
- Warm the peanut butter slightly so it drizzles easily.
- Dollop it over the batter and swirl it through with a knife.
- Bake for 28 to 30 minutes until set.
- Cool before slicing into squares.
Notes
11) Red Velvet Biscotti Brownies

These red velvet biscotti brownies are great for dipping in coffee. They're chewy in the middle and crisp on the edge, and you're going to love them. Red velvet again is cocoa, red food coloring, and a buttermilk with vinegar that gives you a subtly chocolatey flavor while also being slightly tangy. The biscotti brownie hybrid gives you the brownie richness with the biscotti snap, which offers a dual texture, and that is the selling point with these ones.
That chewy center is going to come from a higher fat and sugar ratio and underbaking these slightly. And the crisp edge is from the sugar caramelizing at the point of contact with the pan. Classic biscotti is twice baked for crunch. The coffee pairing works because coffee's bitterness is going to cut through the sweetness on these, the same principle as dunking a biscotti.
A common mistake is over-baking these. You want to make sure you don't kill that chewy center, so pull these early and let that carryover heat finish the treat.
Red Velvet Biscotti Brownies
Ingredients
Method
- Preheat the oven to 350°F and line a baking sheet with parchment.
- Mix the butter, sugar, eggs, and red coloring, then fold in the flour, cocoa, and chips.
- Shape the dough into a flat log on the baking sheet.
- Bake for 25 minutes, then cool slightly and slice into bars.
- Lay the slices cut-side down and bake another 18 to 20 minutes until crisp.
- Cool completely so they crisp up fully.
Notes
12) Heart-Shaped Red Velvet Brownies

These heart-shaped red velvet brownies are going to say I love you on Valentine's Day or any day for that matter. Red velvet is the star of the show with this one, and doing them as a brownie makes it denser and fudgier because it uses less flour and has more fat than a typical red velvet cake.
The heart shape is just done by using a simple silicone heart mold or a heart cookie cutter on a sheet pan. Cream cheese frosting is the classic pairing because it's tangy, to contrast with that sweet, rich brownie, and this can be a year-round gift idea, not just February 14th.
Heart-Shaped Red Velvet Brownies
Ingredients
Method
- Bake the red velvet brownie batter in a thin layer at 350°F for 24 to 28 minutes, then cool.
- Use a heart-shaped cookie cutter to cut out shapes.
- Drizzle or pipe the white frosting over each heart.
- Add sprinkles if you like for extra cuteness.
- Let the frosting set before serving.
- Arrange on a pretty platter.
Notes
13) Red Velvet Raspberry Brownies

Raspberry red velvet brownies brighten thick red velvet with a fresh, fruity addition. Raspberries add that acidity that is going to amplify the cocoa flavor in red velvet and offer more than just a color contrast. Frozen berries will release more juice, and they can streak the batter, whereas fresh will hold their shape better.
A common mistake is overmixing once you add in the berries, because it's going to break them down and turn this batter muddy, and you want to avoid that. The brownie texture, which has a denser base than cake, allows the raspberries to stand out rather than disappear.
Ingredients
Method
- Simmer the raspberries with the extra sugar until jammy, then mash and cool.
- Preheat the oven to 350°F and line a pan with parchment.
- Make the red velvet brownie batter and spread it into the pan.
- Dollop the raspberry sauce over the top and swirl with a knife.
- Bake for 28 to 30 minutes until set.
- Cool before slicing into squares.
Notes
14) Marbled Red Velvet Brownies

When you pull these out of the oven, you'll get a two-tone finish that makes them look really impressive and more high-end than they actually are. Marbling is simply swirling two batters together, in this case red velvet and cream cheese, or plain chocolate, before baking. This is a technique; it is not decoration. This visual contrast creates a bakery-worthy effect, and it triggers the perceived effort and complexity of the dish. Red velvet's color is what really makes these stand out.
That said, a common mistake would be over-swirling, collapsing the pattern. You want to just do three to four figure eights max. This is also really budget-friendly as it uses the same pantry staples as standard brownies. It's just portioned differently.
Marbled Red Velvet Brownies
Ingredients
Method
- Preheat the oven to 350°F and line a pan with parchment.
- Whisk the butter, sugar, eggs, and vanilla, then fold in the flour.
- Divide the batter in half, stirring cocoa into one half and red coloring into the other.
- Spoon both batters into the pan in alternating dollops.
- Swirl them together gently with a knife.
- Bake for 28 to 30 minutes, then cool before slicing.
Notes
15) Red Velvet Brownies with a Ganache Glaze

These look bakery-worthy thanks to that shiny ganache. Ganache is chocolate with warm heavy cream, and that ratio matters. It's going to be roughly 2:1 chocolate to cream for a thick glaze, and 1:1 for a pourable one. That shiny finish comes from the emulsification of the fat in the cream.
Pouring it warm over cooled brownies preserves that gloss, so make sure your brownies cool. If not, adding that ganache to a warm brownie will actually cause them to absorb it instead of allowing it to set on top. Red velvet brownies are denser and fudgier than red velvet cake, so you don't need any leavening agents here.
Red Velvet Brownies with a Ganache Glaze
Ingredients
Method
- Bake the red velvet brownie batter at 350°F for 26 to 28 minutes, then cool.
- Heat the cream until steaming and pour it over the chocolate chips.
- Stir into a smooth, glossy ganache.
- Pour the ganache over the cooled brownies and spread evenly.
- Chill until the glaze is set.
- Slice into clean squares.
Notes
16) Red Velvet Turtle Brownies

These red velvet turtle brownies combine caramel, pecans, and red velvet for a maxed-out dessert. Turtle is a classic candy combo of caramel, pecans, and chocolate, and it dates back to the early 1900s.
The brownie base matters on this one. You want fudgy instead of cakey because it affects how the toppings absorb, since fudgy holds up better under that gooey caramel. The pecans also need to be toasted. That makes a big flavor difference with this one because toasting brings out the oils and the crunch.
A common mistake is adding caramel to a warm brownie, which will cause it to melt, so make sure your brownies are cool. That way, this has a really pretty caramel topping.
Ingredients
Method
- Preheat the oven to 350°F and line an 8-inch square pan with parchment.
- Make the red velvet brownie batter and fold in half the pecans.
- Spread into the pan and bake for 26 to 28 minutes.
- Drizzle the warm brownies with caramel sauce.
- Scatter the remaining pecans and a chocolate drizzle over the top.
- Cool before slicing into squares.
Notes
17) Salted Caramel Red Velvet Brownies

The salted caramel red velvet brownies are dangerously easy to overeat due to their sweet, salty, and gooey combination. Salt suppresses the bitterness and amplifies the sweetness on this one, which is a key reason why salted caramel fills more.
The gooey texture in brownies comes from underbaking them slightly and using more fat, either butter or oil, than you do flour. And that sweet and salty combo triggers reward pathways more than either one does on its own. This is well documented in food science, which makes this recipe a hit.
A common mistake, though, is oversalting that caramel layer, which will kill the balance. Be sure to use a flaky finishing salt like Maldon, which is preferable to fine salt.
Salted Caramel Red Velvet Brownies
Ingredients
Method
- Preheat the oven to 350°F and line an 8-inch square pan with parchment.
- Make the red velvet brownie batter and spread half of it in the pan.
- Drizzle with caramel sauce, then top with the remaining batter.
- Swirl a knife through and sprinkle with flaky salt.
- Bake for 28 to 30 minutes until set.
- Cool completely before slicing.