Welcome to this collection of delicious recipes! Each recipe has been carefully crafted with detailed instructions and ingredient lists to help you create amazing dishes.
Here’s the thing about omelets for dinner—they feel fancy enough that the kids think it’s a special occasion, but they’re actually easier than most weeknight meals. The secret to a really fluffy omelet is adding a splash of milk and whisking like your arm might fall off.
I mean it! Those extra 30 seconds of whisking incorporate air that makes all the difference between a sad, flat egg pancake and a gorgeous, pillowy omelet.
I like to set up an omelet bar where everyone customizes their own. Cook the bacon first (I do mine in the oven at 400°F for about 15 minutes—game changer, no splatter), then let each person pick their fillings.
Besides the bacon and cheese, I put out diced peppers, mushrooms, spinach, and tomatoes. The kids feel like they’re at a restaurant, and honestly, they eat way more vegetables this way than if I just made the omelets myself.
Pro tip: Use medium-low heat and be patient. I know we’re all tempted to crank up the burner, but high heat makes rubbery eggs.
You want them creamy and soft, which takes about 3-4 minutes. And if your omelet breaks when you flip it?
Just call it a scramble and move on with your life—it’ll taste just as amazing.
Stroller Envy
Classic Bacon and Egg Omelets
A printable version of classic bacon and egg omelets.
Heat oven to 400°F. Arrange bacon on a rimmed baking sheet and cook 15-20 minutes until crisp; drain and crumble.
Make four omelets separately. For each, whisk 3 eggs, 1 tablespoon milk, one quarter of the salt and pepper.
Melt 1 tablespoon butter in an 8-inch nonstick skillet over medium-low heat. Pour in the eggs. After 30 seconds, push set edges inward and tilt to distribute uncooked egg.
When nearly set, put one quarter of the bacon and 1/4 cup cheddar over half the omelet. Fold and continue cooking gently until no liquid egg remains and the center reaches 160°F, about 4-6 minutes total.
Serve immediately and repeat with remaining ingredients.
Notes
Equipment: 8-inch nonstick skillet, rimmed baking sheet, instant-read thermometer.Serving size: one 4th of the recipe.
Breakfast Sandwiches with Cheese
These homemade breakfast sandwiches are infinitely better than the drive-through version, and here’s why: you can toast the English muffins in butter. I know, I know—it’s extra calories, but it’s also extra delicious, and we’re having breakfast for dinner, so all rules are out the window.
That golden, crispy, buttery exterior makes everyone think you’ve put in way more effort than you actually have. My trick is to use a griddle so I can cook multiple eggs at once and have all the sandwiches ready at the same time—no one eating while everyone else watches.
The cheese situation is crucial. American cheese melts like a dream (I’m not ashamed to say I use it!), but if you want to upgrade, try sharp cheddar or pepper jack for the adults’ sandwiches.
Cook the eggs until the whites and yolks are firm, then add the cheese during the last minute so it melts over the egg.
Make a double batch and wrap the extras individually in foil. They freeze beautifully, and then you’ve got ready-made breakfast (or dinner!) for those truly chaotic mornings.
Remove all foil before microwaving on a microwave-safe plate, and heat until the center reaches 165°F; the time depends on your microwave and sandwich size.
Stroller Envy
Breakfast Sandwiches with Cheese
A printable version of breakfast sandwiches with cheese.
Butter the muffin cut sides with 2 tablespoons butter. Toast cut-side down in a skillet over medium heat for 2-3 minutes; set aside.
Cook the four sausage patties according to package directions until the centers reach 160°F; keep warm.
Melt remaining tablespoon butter over medium-low heat. Add eggs and cook, turning carefully, until whites and yolks are firm, about 3-4 minutes per side. Top each with cheese during the last minute.
Fill each muffin with sausage and a cheesy egg; serve.
For freezing, refrigerate sandwiches promptly until cold, then wrap individually and freeze. Remove ALL foil before microwaving. Place on a microwave-safe plate, cover with a paper towel, and heat in short intervals, turning as needed, until the center reaches 165°F. Timing depends on microwave power and sandwich size.
Notes
Equipment: large skillet, instant-read thermometer.Serving size: one 4th of the recipe.
Savory Breakfast Pizza
Breakfast pizza is the dinner idea that makes you look like a creative genius, but I’m going to let you in on a secret: use store-bought pizza dough or even naan bread. Nobody—and I mean nobody—will know the difference, and you’ll actually enjoy making dinner instead of stressing about it.
I brush the dough with olive oil, sprinkle it with garlic powder, and pre-bake it for about 5 minutes before adding toppings. This keeps the crust crispy even under all those eggs and toppings.
Instead of marinara sauce, I use a base of scrambled eggs mixed with a little cream cheese—sounds weird, but it creates this creamy, custardy layer that holds everything together. Then pile on cooked sausage, bacon, peppers, onions, and lots of shredded cheese.
The key is to crack a few whole eggs on top about halfway through baking. Cook those topping eggs until the whites and yolks are firm.
Pure magic. My kids fight over the slices with the whole eggs.
This is also perfect for using up random bits in your fridge—leftover ham, that half bell pepper, those three sad mushrooms. Everything tastes good on breakfast pizza.
Cut it into squares instead of triangles for some reason that makes kids more excited, and serve it with hot sauce on the side for the adults. Breakfast pizza night has become a weekly request at our house.
Transfer the dough (on the parchment) to the hot pizza stone and pre-bake for 5 minutes. Remove from oven.
Whisk 6 eggs with softened cream cheese; small cheese flecks are fine. Scramble in a nonstick skillet over medium-low heat until softly set.
Spread the scrambled eggs evenly over the pre-baked crust, leaving a ½-inch border.
Top with 1 cup of cooked, crumbled breakfast sausage, ½ cup of diced bell peppers, ½ cup of diced onions, and 1½ cups of shredded mozzarella and cheddar cheese.
Make 4 small wells in the toppings and crack a whole egg into each well.
Bake for 12-18 minutes until crust is baked and egg whites and yolks are firm; the meat-and-egg topping must reach 165°F. Loosely shield the crust with foil if it browns first.
Let cool for 3-4 minutes, then slice and serve with hot sauce on the side.
Notes
Equipment: 12-inch pizza pan or baking sheet, nonstick skillet, instant-read thermometer.Serving size: one 6th of the recipe.
Ham and Cheddar Quiche
This ham and cheddar quiche is basically what happens when you take all the best parts of a classic diner breakfast and put them in a flaky pie crust. I love making this on Sunday afternoon and serving it for dinner that night, because it actually tastes even better after sitting for about 20 minutes—the custard sets up perfectly and slices like a dream.
The secret is using really good sharp cheddar (none of that pre-shredded stuff!) and cubing your ham instead of using those thin deli slices, which gives you these satisfying little pockets of salty, savory goodness in every bite.
Here’s the game-changer: blind bake your crust for 15 minutes with weights, then 5 minutes without them before adding the filling. I know it’s an extra step, but trust me on this one.
It creates a barrier that keeps the bottom crust crispy instead of soggy, which is honestly the difference between an okay quiche and one that makes your family ask for seconds. I also whisk in a tablespoon of Dijon mustard into the egg mixture—it’s subtle enough that the kids won’t notice, but it adds this incredible depth that makes people wonder what your secret is.
The best part about serving quiche for dinner is that it feels fancy but is actually incredibly forgiving. You can prep everything in the morning, keep it in the fridge, and just pop it in the oven an hour before dinner.
Pair it with a simple green salad or some roasted vegetables, and you’ve got a complete meal that doesn’t require you to stand over the stove during the chaos of evening homework and activity schedules.
Fit the crust into a deep 9-inch pie dish at least 2 inches deep and crimp the edges. Set on a rimmed baking sheet.
Line with parchment and fill with pie weights. Bake for 15 minutes; remove weights and parchment and bake another 5 minutes until the bottom looks dry.
Let the crust cool slightly. Keep the oven at 375°F.
In a large bowl, whisk together 5 large eggs, 1 cup of heavy cream, ½ cup of whole milk, 1 tablespoon of Dijon mustard, ½ teaspoon of salt, and ¼ teaspoon of black pepper.
Pour filling into the crust, leaving 1/4 inch below the rim. If any filling remains, bake separately in a greased ramekin rather than overfilling.
Bake for about 40-50 minutes until the center reaches 165°F and has only a gentle wobble. Cover the crust edges if browning too quickly.
Let cool for at least 15-20 minutes before slicing (this helps it set properly).
Serve warm or at room temperature with a side salad.
Notes
Equipment: deep 9-inch pie dish, rimmed baking sheet, pie weights, instant-read thermometer.Serving size: one 8th of the recipe.
Veggie Frittata with Spinach
If you’ve never made a frittata before, think of it as a crustless quiche that you can throw together in about 30 minutes flat. This veggie-packed version is my go-to when I’m trying to clean out the produce drawer, and it’s genuinely one of those recipes where my kids eat their vegetables without complaining.
The spinach wilts down to almost nothing, so even my pickiest eater doesn’t put up a fight. I usually add whatever other vegetables I have on hand—bell peppers, mushrooms, zucchini, cherry tomatoes—they all work beautifully.
The technique that changed my frittata game forever is starting it on the stovetop and finishing it under the broiler. You get these gorgeous, crispy edges from the skillet, and the broiler puffs up the top into this golden, slightly browned masterpiece.
Just make sure you’re using an oven-safe skillet (I learned this the hard way with a melted handle situation we don’t need to discuss). Another pro tip: let your eggs come to room temperature for about 15 minutes before whisking them.
They’ll cook more evenly and create a fluffier texture that’s closer to a soufflé than scrambled eggs.
What I love most about this dinner is how versatile it is. Serve it hot from the oven, at room temperature, or even cold the next day for leftovers—it’s delicious every way.
I like to cut it into wedges and serve it with crusty bread and maybe a simple tomato salad. It’s filling enough to satisfy everyone but light enough that you don’t feel overly stuffed, which is exactly what I want on a busy weeknight.
Stroller Envy
Veggie Frittata with Spinach
A printable version of veggie frittata with spinach.
Preheat your broiler to high and position the rack about 6 inches from the heat source.
In a large oven-safe skillet (12 inches, broiler-safe), heat 2 tablespoons of olive oil over medium heat.
Add 1 diced bell pepper, 1 cup of sliced mushrooms, and ½ diced onion. Sauté for 5-6 minutes until softened.
Add 2 cloves of minced garlic and 3 cups of fresh spinach. Cook for 2 minutes until the spinach wilts.
In a large bowl, whisk together 10 eggs, ¼ cup of milk, ½ cup of grated Parmesan cheese, 1 teaspoon of salt, and ½ teaspoon of black pepper.
Pour the egg mixture over the vegetables in the skillet, gently stirring to distribute evenly.
Cook on the stovetop without stirring for 5-7 minutes, until the edges are set but the center is still slightly jiggly.
Transfer the skillet to the oven and broil for 3-5 minutes until the top is puffed and golden brown. Check the center reaches 160°F; if it needs longer after browning, lower oven to 350°F and bake gently until done.
Remove from oven and let cool for 5 minutes.
Slice into wedges and serve warm or at room temperature.
Notes
Equipment: 12-inch broiler-safe skillet, instant-read thermometer.Serving size: one 6th of the recipe.
Breakfast Burritos Loaded Up
These aren’t your sad gas station breakfast burritos—these are loaded-up, everyone-gets-to-customize, practically-a-complete-meal burritos that happen to be easy enough for a Tuesday night. I set up a burrito bar with all the fixings, and my kids go absolutely wild for it.
We’re talking scrambled eggs (or tofu scramble if you have vegetarians), crispy breakfast potatoes, black beans, sautéed peppers and onions, cheese, salsa, avocado, and sour cream. It’s honestly more fun than taco night, and that’s saying something in our house.
The key to really good breakfast burritos is getting that perfect ratio of ingredients and knowing how to fold them properly so they don’t fall apart. I warm my tortillas in a dry skillet first—this makes them pliable and adds a little bit of char that tastes amazing.
Then I layer strategically: cheese goes down first (it acts like glue), then eggs, then everything else, making sure not to overfill because we’ve all had that burrito explosion experience. The fold is: sides in first, then roll from the bottom up tightly, keeping everything tucked in as you go.
Game changer.
What makes this perfect for dinner is that everyone can make their burrito exactly how they want it, which means no complaints about “I don’t like peppers” or “there’s too much cheese” (as if that’s possible). I prep all the components in about 30 minutes, set everything out buffet-style, and let everyone assemble their own.
The kids feel independent, I don’t have to be a short-order cook, and somehow vegetables disappear when people choose to add them themselves. Plus, any leftovers wrap up beautifully for lunch the next day.
Stroller Envy
Breakfast Burritos Loaded Up
A printable version of breakfast burritos loaded up.
Peel and dice 2 large potatoes into ½-inch cubes. Boil for 5 minutes, then drain and pat dry.
Heat 2 tablespoons of oil in a large skillet and cook the potatoes over medium-high heat for 8-10 minutes until crispy and golden. Season with salt, pepper, and ½ teaspoon of paprika. Remove to a plate.
Cook the sausage in the skillet until crumbled and 160°F, about 8-10 minutes. Transfer to a bowl and drain excess fat.
Add the remaining tablespoon oil and sauté pepper and onion for 5-7 minutes until tender; transfer to a bowl.
Scramble 8 eggs with 2 tablespoons milk over medium-low heat until set and 160°F. Season with salt and pepper.
Warm 8 large 12-inch flour tortillas in a dry skillet until pliable.
Warm the drained beans. Set out the eggs, potatoes, meat, peppers, onions, cheese, salsa and optional toppings.
To assemble: place a warm tortilla on a flat surface, add a layer of shredded cheese in the center (this acts as glue).
Add your desired fillings in the center, being careful not to overfill.
Fold in the sides, then roll tightly from the bottom up, keeping everything tucked in as you roll.
Optional: toast the wrapped burrito seam-side down in a skillet for 1-2 minutes for extra crispiness.
Notes
Equipment: large skillet, instant-read thermometer.Serving size: one 8th of the recipe.
Crispy Hash Brown Casserole
This isn’t your average mushy hash brown casserole—the secret is cranking up the oven temperature for the last 15 minutes to get those edges seriously crispy and golden. I use frozen shredded hash browns (no shame in convenience!), but the game-changer is squeezing out as much moisture as possible before mixing.
Just wrap them in a clean kitchen towel and wring away. That extra step means the difference between soggy and restaurant-quality crispy.
The creamy base comes together with sour cream, cream of chicken soup, and plenty of sharp cheddar—but here’s my trick: I reserve about a cup of cheese to sprinkle on top during those final minutes. It creates this incredible cheesy crust that my kids literally fight over.
Some people add cornflakes on top, but I find that extra cheese plus the high-heat finish gives you all the crunch you need.
This casserole is the ultimate crowd-pleaser for breakfast-for-dinner night because it feeds a hungry family easily and tastes even better than the diner version. Plus, you can assemble it in the morning and just pop it in the oven when dinner rolls around.
Pair it with scrambled eggs or serve it as the main event with a simple side salad—either way, there won’t be leftovers.
Stroller Envy
Crispy Hash Brown Casserole
A printable version of crispy hash brown casserole.
30ozfrozen shredded hash browns, thawed and squeezed dry
1can(10.5 oz) cream of chicken soup
2cupssour cream
3cupsshredded sharp cheddar, divided
1/2cupbutter, melted
1/2cupdiced onion
1teaspoongarlic powder
1/2teaspoonsalt
1/2teaspoonpepper
Cooking spray, for dish
Method
Preheat your oven to 350°F and grease a 9×13-inch baking dish.
Thaw 1 bag (30 oz) of frozen shredded hash browns and squeeze out as much moisture as possible using a clean kitchen towel.
In a large bowl, mix together the dried hash browns, 1 can (10.5 oz) of cream of chicken soup, 2 cups of sour cream, 2 cups of shredded sharp cheddar cheese, ½ cup of melted butter, ½ cup of diced onion, 1 teaspoon of garlic powder, 1/2 teaspoon of salt, and ½ teaspoon of black pepper.
Spread the mixture evenly in the prepared baking dish.
Reserve the remaining 1 cup of cheese for topping (3 cups total in the recipe).
Bake uncovered for 45 minutes.
Remove from oven and sprinkle the reserved cheese evenly over the top.
Increase oven temperature to 425°F and return the casserole to the oven for 12-15 minutes until the top is golden brown and crispy around the edges. Center should reach 165°F.
Let rest for 5-10 minutes before serving.
Serve as a side dish or as the main event with eggs on top.
Notes
Equipment: 9×13-inch baking dish, mixing bowl, instant-read thermometer.Serving size: one 10th of the recipe.
These tacos bring all the fun of Tex-Mex breakfast to your dinner table, and the star is definitely the chorizo. I use Mexican-style fresh chorizo (not the cured Spanish kind), which you crumble and cook until it’s beautifully browned and releases all those incredible spices.
The key is not to crowd the pan—let it develop those crispy edges before you scramble in the eggs. That texture contrast between the crispy chorizo bits and fluffy eggs is absolutely essential.
I set up a taco bar situation so everyone can build their own, which makes dinnertime way more fun and cuts down on the “I don’t like that” complaints. Warm flour tortillas, the chorizo-egg mixture, shredded cheese, diced avocado, salsa, cilantro, and a squeeze of lime.
My kids love adding a dollop of sour cream, and honestly, it does help cool things down if your chorizo has some heat. The whole meal comes together in about 20 minutes, which is faster than most weeknight dinners.
What I love most is how satisfying these are without being heavy. The protein from the eggs and chorizo keeps everyone full, but it doesn’t have that weighed-down feeling of a big traditional dinner.
Make extra chorizo if you can—it reheats beautifully and makes an incredible quick breakfast the next morning stuffed into a burrito.
Stroller Envy
Breakfast Tacos with Chorizo
A printable version of breakfast tacos with chorizo.
Remove 1 pound of fresh Mexican chorizo from its casings and crumble into a large skillet.
Cook over medium-high heat for 6-8 minutes, breaking it into small pieces, until browned and crispy. Don't crowd the pan – let it develop those crispy edges. Pork chorizo must reach 160°F.
Remove the chorizo with a slotted spoon to a plate, leaving about 1 tablespoon of fat in the pan.
Reduce heat to medium-low and add 8 beaten eggs to the same skillet.
Scramble gently until set with no liquid egg remaining, about 3-4 minutes, and 160°F.
Return the chorizo to the pan and fold together with the eggs. Remove from heat.
Warm 10 tortillas in a dry skillet; keep wrapped in a clean towel.
Set up a taco bar with: the chorizo-egg mixture, shredded cheese, diced avocado, salsa, chopped cilantro, lime wedges, and sour cream.
Let everyone build their own tacos with their favorite toppings.
Serve immediately while everything is warm.
Notes
Equipment: large skillet, instant-read thermometer.Serving size: one 5th of the recipe.
French Toast with Maple Syrup
The secret to truly exceptional French toast is using day-old bread (or bread you’ve dried out in a 200°F oven for 10 minutes). Fresh bread just gets soggy and falls apart, but slightly stale bread soaks up that custard mixture perfectly without disintegrating.
I use thick-cut Texas toast or challah when I’m feeling fancy, and the custard itself is simple: eggs, milk, vanilla, cinnamon, and just a pinch of salt to balance the sweetness.
Here’s the technique that changed everything for me: medium-low heat and patience. I know it’s tempting to crank the heat to get dinner on the table faster, but French toast needs slow, gentle cooking to set that eggy custard all the way through while getting golden and slightly crispy on the outside.
Give each side a good 3-4 minutes, and don’t flip it more than once. I also swipe the pan with butter before each batch, which creates the most incredible buttery crust.
When this comes out for dinner instead of breakfast, my kids think it’s the best surprise ever. I serve it with warm maple syrup (the real stuff makes a difference), fresh berries, and sometimes a dusting of powdered sugar if we’re really celebrating.
It’s comfort food that feels a little bit special, and paired with some crispy bacon or breakfast sausage, it’s a complete meal that satisfies even the pickiest eaters.
Stroller Envy
French Toast with Maple Syrup
A printable version of french toast with maple syrup.
If using fresh bread, arrange 8 slices of thick-cut bread on a baking sheet and place in a 200°F oven for 10 minutes to dry out slightly.
In a shallow bowl, whisk together 4 eggs, 1 cup of whole milk, 1 tablespoon of vanilla extract, 1 tablespoon of sugar, 1 teaspoon of cinnamon, and a pinch of salt.
Heat a large skillet or griddle over medium-low heat and add 1 tablespoon of butter.
Dip each bread slice into the egg mixture, letting it soak for about 10 seconds per side (don't oversoak or it will fall apart).
Place the soaked bread in the hot skillet and cook for 3-4 minutes per side until golden brown and cooked through. The egg-soaked centers must be cooked, not wet; check 160°F if uncertain.
Add more butter to the pan between batches as needed.
Keep finished French toast warm in a 200°F oven while you cook the remaining slices.
Serve with maple syrup and optional berries and powdered sugar.
Notes
Equipment: large skillet, instant-read thermometer.Serving size: one 4th of the recipe.Timing includes several skillet batches; a large griddle shortens cooking.
There’s a secret to getting pancakes that are genuinely fluffy—not just flat, dense discs pretending to be breakfast—and it’s all about not overmixing that batter. I know it’s tempting to stir until every single lump disappears, but those lumps are your friends!
They mean you haven’t overdeveloped the gluten, which is what turns pancakes tough and rubbery. Mix just until the dry ingredients are moistened, even if it looks a little rough.
The buttermilk does double duty here, adding tang and reacting with the baking soda to create extra lift.
The other game-changer? Let your batter rest for about 5 minutes before you start cooking.
This gives the flour time to hydrate and the leavening agents time to start working their magic. You’ll actually see little bubbles forming on the surface—that’s exactly what you want.
When you finally pour them onto a medium-heat griddle (not too hot, or they’ll burn before cooking through), you’ll get these beautifully golden pancakes that are crispy on the edges and impossibly soft in the middle.
My kids request these at least twice a week for dinner, and honestly, I don’t mind one bit. They’re ready in about 20 minutes from start to finish, and there’s something so comforting about a stack of warm pancakes on a busy weeknight.
Serve them with real maple syrup, a pat of butter, and maybe some fresh berries if you’re feeling fancy.
Stroller Envy
Fluffy Buttermilk Pancakes
A printable version of fluffy buttermilk pancakes.
In a large bowl, whisk together 2 cups of all-purpose flour, 2 tablespoons of sugar, 2 teaspoons of baking powder, 1 teaspoon of baking soda, and ½ teaspoon of salt.
In a separate bowl, whisk together 2 cups of buttermilk, 2 eggs, and ¼ cup of melted butter.
Pour the wet ingredients into the dry ingredients and stir gently with a wooden spoon until just combined. The batter should be lumpy – do not overmix!
Let the batter rest for 5 minutes while you heat your griddle or skillet.
Heat a griddle or large skillet over medium heat and lightly grease with butter.
Pour ¼ cup of batter onto the griddle for each pancake.
Cook for 2-3 minutes until bubbles form on the surface and the edges look set.
Flip and cook for another 2 minutes until golden brown on both sides.
Keep finished pancakes warm in a 200°F oven while you cook the rest.
Serve hot with butter and maple syrup.
Notes
Equipment: large griddle or skillet, mixing bowls.Serving size: one 6th of the recipe.Makes approximately 16-18 pancakes using 1/4 cup batter each; serving is about 3 pancakes.
Belgian Waffles and Bacon
Belgian waffles are a completely different beast from regular waffles—they’re thicker, they’ve got those deep pockets that hold onto syrup like little delicious wells, and when you get them right, they’re crispy on the outside and custardy on the inside. The trick is separating your eggs and whipping those whites to soft peaks before folding them into the batter.
Yes, it’s an extra step, but it’s what creates that incredible texture. The whipped egg whites make the waffles light and airy while still maintaining that satisfying crunch.
Don’t skip preheating your waffle iron thoroughly—I’m talking a good 5 minutes. A properly heated iron is what gives you that golden, crispy exterior.
And here’s my favorite time-saving hack for dinner: I cook the bacon in the oven on a sheet pan while the waffle iron heats up. Just lay the strips on a foil-lined pan and bake at 400°F for about 15-20 minutes.
It cooks evenly, you don’t have to stand over a splattering pan, and you can make a whole pound at once.
This combo is peak breakfast-for-dinner material because it feels special without being complicated. The kids love drizzling syrup into all those waffle pockets, and the salty-sweet combo of crispy bacon with warm waffles never gets old.
Plus, it’s one of those meals where everyone’s genuinely excited when they see it on the table.
Preheat your oven to 400°F and line a baking sheet with foil.
Arrange 1 pound of bacon in a single layer on the prepared baking sheet. Bake for 15-20 minutes until crispy. Drain on paper towels.
While bacon cooks, preheat your Belgian waffle iron according to manufacturer's instructions (about 5 minutes).
In a large bowl, whisk together 2 cups of all-purpose flour, 2 tablespoons of sugar, 1 tablespoon of baking powder, and ½ teaspoon of salt.
Separate 2 eggs. Place the yolks in a medium bowl and the whites in a clean, dry bowl.
Add 1¾ cups of milk and ½ cup of melted butter to the egg yolks and whisk to combine.
Using an electric mixer, beat the egg whites until soft peaks form.
Pour the wet ingredients into the dry ingredients and stir until just combined (batter will be lumpy).
Gently fold the whipped egg whites into the batter until just incorporated.
Pour the recommended amount of batter into the preheated waffle iron and cook according to manufacturer's instructions (usually 4-5 minutes) until golden and crispy. Cook until steam subsides and the inside has no wet batter.
Serve immediately with the crispy bacon and warm maple syrup.
Notes
Equipment: Belgian waffle iron, rimmed baking sheet, electric mixer.Serving size: one 6th of the recipe.Makes about 6 large Belgian waffles, depending on the iron. Cooking time includes consecutive waffle batches; follow your appliance capacity.
Avocado Toast with Fried Eggs
I know, I know—avocado toast sounds trendy and maybe a little too simple to count as a real dinner. But hear me out: when you top thick, crusty sourdough with perfectly smashed avocado and a fried egg cooked until the white and yolk are firm, it becomes something substantial enough to satisfy even hungry teenagers.
The key is using really good bread—none of that squishy sandwich bread. You want something with texture that can stand up to toasting and hold all your toppings without getting soggy.
For the avocado, I mash it right on the toast with a fork, then season it generously with flaky sea salt, cracked black pepper, and a squeeze of fresh lemon juice. That citrus is essential—it brightens everything and keeps the avocado from turning brown if you have leftovers (though in my house, that never happens).
The fried egg technique matters too: use medium heat and a generous pat of butter in your pan. Cook gently, turning or covering the egg as needed, until both the white and yolk are firm.
Serve the cooked egg over the seasoned avocado while the toast is still crisp.
This is my go-to when I need dinner on the table in literally 10 minutes, and it’s healthy enough that I don’t feel guilty serving it. Sometimes I add everything bagel seasoning or red pepper flakes on top, and the kids like theirs with a little shredded cheese.
It’s endlessly customizable and always delicious.
Stroller Envy
Avocado Toast with Fried Eggs
A printable version of avocado toast with fried eggs.
Toast 4 thick slices of sourdough or whole grain bread until golden and crispy.
While bread toasts, heat 2 tablespoons of butter in a large nonstick skillet over medium heat.
Crack 4 eggs into the skillet, being careful not to break the yolks.
Cook the eggs over medium-low heat, turning or covering as needed, until whites and yolks are firm, about 5-8 minutes.
Season the eggs with salt and pepper.
While eggs cook, halve and pit 2 ripe avocados.
Place one avocado half on each piece of toast and mash with a fork directly on the bread.
Season the mashed avocado with flaky sea salt, cracked black pepper, and a squeeze of fresh lemon juice.
Top each avocado toast with a fried egg.
Sprinkle with optional everything bagel seasoning.
Serve immediately.
Notes
Equipment: large skillet, instant-read thermometer.Serving size: one 4th of the recipe.
Sausage and Egg Casserole
This is the breakfast-for-dinner recipe I make when I need something that can sit in the oven while I help with homework or fold laundry. The casserole combines browned sausage and softened vegetables with bread and a raw egg mixture, then bakes until set.
I brown the sausage first because that rendered fat adds so much flavor to the bread cubes, but everything else just gets tossed in the baking dish. Soften the vegetables with the browned sausage before assembling.
The key is using day-old bread or even slightly stale cubes because they soak up the egg mixture without getting mushy. I’ve made the mistake of using fresh, soft bread before, and it turned into a soggy mess.
Now I buy an extra loaf on the weekend specifically to let it dry out a bit. If you’re in a pinch, just spread your bread cubes on a baking sheet and toast them for 5 minutes.
What the kids love most is how customizable this is—my pickiest eater skips the peppers, my husband loads his portion with hot sauce, and I add extra cheese to mine. The leftovers (if there are any!) reheat perfectly in the microwave for actual breakfast the next morning, which feels like a wonderful full-circle moment.
Preheat your oven to 350°F and grease a 9×13-inch baking dish.
Cut 1 loaf of day-old bread into 1-inch cubes (about 8 cups). Spread on a baking sheet and toast in the oven for 5-7 minutes if the bread is fresh.
In a large skillet, cook 1 pound of breakfast sausage over medium heat, breaking it into crumbles, until browned and cooked through (about 6-8 minutes). Ground pork must reach 160°F.
Add 1 diced bell pepper and ½ diced onion to the sausage and cook for 3-4 minutes until softened. Remove from heat.
In a large bowl, whisk together 10 eggs, 2 cups of milk, 1 teaspoon of dry mustard, 1 teaspoon of salt, and ½ teaspoon of black pepper.
Add the toasted bread cubes, sausage-vegetable mixture, and 2 cups of shredded cheddar cheese to the egg mixture. Stir to combine.
Pour everything into the prepared baking dish and press down gently to ensure the bread is submerged in the egg mixture.
Cover with foil and bake for 30 minutes.
Remove foil and bake for an additional 15-20 minutes until the top is golden brown and the center is set. The center must reach 165°F.
Let rest for 10 minutes before serving.
Notes
Equipment: 9×13-inch baking dish, large skillet, instant-read thermometer.Serving size: one 8th of the recipe.
Breakfast Nachos with Cheese
I stumbled onto breakfast nachos during a particularly chaotic week when I had a pile of tortillas that needed using up, and honestly, they’ve become a monthly tradition now. The secret is crisping the tortilla chips yourself in the oven with a light spray of oil—they stay crunchy even under all the toppings in a way store-bought chips just don’t.
Plus, you can control the salt, which matters when you’re already adding sausage, cheese, and all the fixings.
Here’s what makes these work for dinner: I treat them like loaded nachos, not just a breakfast plate. We’re talking scrambled eggs as the base, then crumbled breakfast sausage or bacon, three kinds of cheese (because why not?), black beans for substance, and all the toppings your family loves.
I set out little bowls of salsa, sour cream, jalapeños, and diced avocado so everyone can build their perfect bite. My kids think it’s the coolest dinner ever, and I love that it’s actually pretty balanced.
The timing is everything here—make the chips first and keep them warm, scramble your eggs until they’re just barely set (they’ll continue cooking from residual heat), and assemble right before serving. Nothing worse than soggy nachos!
I’ve learned to make extra because my teenagers will absolutely demolish the first pan.
Stroller Envy
Breakfast Nachos with Cheese
A printable version of breakfast nachos with cheese.
Heat oven to 400°F. Line two rimmed baking sheets with parchment.
Cut tortillas into 6 triangles each and spread in one layer across both sheets.
Spray lightly with cooking spray and sprinkle with salt. Bake for 8-10 minutes until crispy and golden. Set aside.
In a large skillet, cook 1 pound of breakfast sausage until browned and crumbled. Remove to a plate. Pork sausage must reach 160°F.
In the same skillet, scramble 8 eggs over medium-low heat until just set but still slightly soft. Remove from heat.
Arrange the baked tortilla chips on a large oven-safe platter or baking sheet.
Top with the scrambled eggs, cooked sausage, 1 can of black beans (drained and rinsed), and 2 cups of shredded Mexican cheese blend.
Bake for 5-8 minutes until cheese melts and the egg-meat topping reaches 165°F.
Remove from oven and immediately top with diced avocado, salsa, sour cream, sliced jalapeños, and chopped cilantro.
Serve immediately while the chips are still crispy.
Notes
Equipment: two rimmed baking sheets, large skillet, instant-read thermometer.Serving size: one 6th of the recipe.
Cheesy Grits Bowl with Sausage
If your family has never been sold on grits, this is the recipe that’ll change their minds. The difference between sad, gluey grits and creamy, dreamy grits is all about the liquid ratio and not walking away from the pot.
I use a mix of milk and chicken broth instead of just water—it makes them ridiculously rich and flavorful. And here’s my non-negotiable: stir in the cheese at the very end, off the heat, so it melts into silky ribbons rather than breaking into grainy bits.
I cook the sausage with a little bit of sage and fennel, then use those browned bits in the pan to sauté some baby spinach. It wilts down to nothing but adds a pop of color and makes me feel slightly better about serving what is essentially a bowl of comfort carbs for dinner.
My husband, who grew up in the South, says these grits are “acceptable,” which in his language means I’ve nailed it.
The bowl concept is what makes this dinner-worthy. Creamy grits on the bottom, sausage and greens in the middle, a fully cooked fried egg on top, and maybe some hot sauce if you’re feeling spicy.
Every bite has that perfect mix of textures—creamy, meaty, and a warm fried egg on top.
It’s cozy, it’s filling, and somehow it feels fancy even though it takes about 55 minutes with stone-ground grits.
Stroller Envy
Cheesy Grits Bowl with Sausage
A printable version of cheesy grits bowl with sausage.
In a medium saucepan, bring 3 cups of chicken broth and 1 cup of milk to a boil.
Slowly whisk in grits. Simmer gently, stirring often, for 30-45 minutes or according to the package, until tender without a gritty center. Add hot water as needed if thick before tender.
While grits cook, heat 1 tablespoon of olive oil in a large skillet over medium heat.
Add 1 pound of Italian sausage (removed from casings) and cook, breaking into crumbles, for 6-8 minutes until browned. Ground pork must reach 160°F.
Add ½ teaspoon of dried sage and ½ teaspoon of fennel seeds to the sausage. Cook for 1 minute.
Add 3 cups of baby spinach to the skillet and cook for 2 minutes until wilted. Remove from heat.
When the grits are done, remove from heat and stir in 1 cup of shredded sharp cheddar cheese, 2 tablespoons of butter, ½ teaspoon of salt, and ¼ teaspoon of black pepper until smooth and creamy.
Divide the cheesy grits among 4 bowls.
Top each bowl with the sausage and spinach mixture.
Use the remaining tablespoon butter to fry four eggs in the skillet until whites and yolks are firm; add one to each bowl.
Serve immediately with hot sauce on the side.
Notes
Equipment: medium saucepan, large skillet, instant-read thermometer.Serving size: one 4th of the recipe.
Baked Eggs in Ramekins
There’s something so special about serving everyone their own little ramekin of baked eggs—it feels fancy, but here’s the secret: it’s actually easier than cooking eggs on the stovetop for a crowd! The key is to add a tablespoon of heavy cream to each ramekin before cracking in the eggs.
This creates the most luxurious, creamy texture and prevents the eggs from getting rubbery in the oven. I learned this trick from a brunch cookbook years ago, and it’s been my go-to ever since.
The beauty of this recipe is how customizable it is. I set out little bowls of shredded cheese, cooked bacon bits, diced tomatoes, and fresh herbs, and let everyone build their own before baking.
My kids love having control over what goes in their ramekin, and it means no complaining about ingredients they don’t like. Pop them all in the oven at 375°F for about 18-25 minutes, until the whites and yolks are set and the filling reaches 165°F that are just begging to be dipped into with toast.
What really makes this a dinner win is the presentation. Each person gets their own hot ramekin (use oven mitts, they stay hot!), and it feels like we’re eating at a cute brunch café instead of our regular Tuesday night dinner table.
Pair these with some crusty bread and a simple side salad, and you’ve got a breakfast-for-dinner meal that feels effortless but looks absolutely impressive.
Heat oven to 375°F. Put four 8-ounce oven-safe ramekins on a rimmed baking sheet.
Put 1 tablespoon cream, 2 tablespoons cooked bacon and 1 tablespoon cheddar in each ramekin.
Crack 2 eggs into each ramekin. Season with salt and pepper.
Bake 18-25 minutes, until whites and yolks are set and the center reaches 165°F because this includes cooked bacon. Oven and ramekin dimensions affect time.
Rest 2 minutes. Use oven mitts to serve the hot ramekins with toast and optional chives.
Notes
Equipment: four 8-ounce ramekins, rimmed baking sheet, instant-read thermometer.Serving size: one 4th of the recipe.
Breakfast Quesadillas with Peppers
If you’ve never tried scrambling eggs directly in the same skillet where you’re building your quesadillas, you’re missing out on a game-changing shortcut. I cook the peppers and onions first, push them to the side, scramble the eggs right there in the same pan, then assemble everything together in the tortilla.
One pan means less cleanup, and everything stays warm and melty together. The peppers add this sweet, slightly smoky flavor that makes these quesadillas taste like something you’d order at a restaurant.
The trick to getting that perfectly crispy, golden exterior is using butter instead of oil, and cooking them on medium heat—not high. I know it’s tempting to crank up the heat to speed things along (believe me, I’ve been there on busy weeknights), but patience pays off here.
The cheese needs time to melt completely while the tortilla crisps up without burning. I usually give each side about 3-4 minutes, pressing down gently with a spatula to help everything meld together.
My kids devour these, and I love that they’re getting vegetables without any pushback. Something about tucking those peppers inside a cheesy quesadilla makes them completely acceptable, even to my pickiest eater.
Serve them with salsa, sour cream, and guacamole for dipping, and cut them into wedges so little hands can grab them easily. These are also fantastic for using up leftover breakfast sausage or bacon if you have any on hand.
Stroller Envy
Breakfast Quesadillas with Peppers
A printable version of breakfast quesadillas with peppers.
On half of a tortilla put one quarter of the egg filling and 1/4 cup cheddar.
Fold the tortilla in half over the fillings and press down gently with a spatula.
Cook for 3-4 minutes until golden brown and crispy on the bottom.
Carefully flip and cook for another 3 minutes until the second side is golden and the cheese is fully melted.
Remove to a cutting board and repeat with remaining tortillas and fillings.
Cut into wedges and serve with optional salsa and sour cream.
Notes
Equipment: large skillet, instant-read thermometer.Serving size: one 4th of the recipe.
Tater Tot Breakfast Casserole
This casserole is the ultimate crowd-pleaser, and I’m convinced it’s because of the crispy tater tot topping. Instead of just sprinkling frozen tots on top, I partially bake them first for about 15 minutes before assembling the casserole.
This extra step ensures they get genuinely crispy instead of staying soft and soggy. Nobody wants mushy tater tots, and this simple technique guarantees that golden, crunchy top layer that everyone fights over.
The base is a simple mixture of beaten eggs, breakfast sausage, cheese, and a splash of milk to keep everything moist and creamy. I brown the sausage the night before if I’m planning ahead, which makes dinner prep incredibly quick.
The beauty of this casserole is that you can assemble it in the morning, keep it in the fridge, and just pop it in the oven when you get home. It bakes for about 40-50 minutes at 350°F, until the center reaches 165°F, which gives you plenty of time to throw together a fruit salad or set the table without feeling rushed.
What I love most is how well this feeds a hungry family. One 9×13 pan easily serves six people with leftovers, and those leftovers reheat beautifully the next day.
My teenagers will actually eat the leftovers cold, straight from the fridge, which tells you everything you need to know about how good this is. It’s comfort food at its finest—hearty, cheesy, and satisfying in a way that makes everyone happy to have breakfast for dinner.
Stroller Envy
Tater Tot Breakfast Casserole
A printable version of tater tot breakfast casserole.
Preheat your oven to 400°F and spray a 9×13-inch baking dish with cooking spray.
Spread 1 bag (32 oz) of frozen tater tots in a single layer on a baking sheet.
Bake for 15 minutes to partially cook and crisp them up. Remove and set aside.
Reduce oven temperature to 350°F.
In a large skillet, cook 1 pound of breakfast sausage over medium heat, breaking into crumbles, until browned and cooked through. Drain excess fat. The sausage must reach 160°F.
In a large bowl, whisk together 12 eggs, 1 cup of milk, 1 teaspoon of salt, ½ teaspoon of black pepper, and ½ teaspoon of garlic powder.
Spread the cooked sausage evenly in the bottom of the prepared baking dish.
Pour the egg mixture over the sausage.
Sprinkle 2 cups of shredded cheddar cheese over the eggs.
Arrange the partially baked tater tots in an even layer on top.
Bake uncovered for 40-50 minutes, until eggs are set and the center reaches 165°F. If the top browns early, tent loosely with foil.
Let rest for 10 minutes before serving.
Cut into squares and serve with hot sauce or ketchup.
Notes
Equipment: 9×13-inch baking dish, rimmed baking sheet, large skillet, instant-read thermometer.Serving size: one 8th of the recipe.
Huevos Rancheros with Beans
This is my go-to recipe when I need something that feels special but comes together in about 20 minutes. The secret is building layers of flavor right in the pan—I crisp up the tortillas in a bit of oil first, which gives you that authentic texture without deep frying.
While those are draining, I quickly warm black beans with cumin and garlic in the same pan, which picks up all those toasty bits from the tortillas.
The real game-changer is making a simple ranchero sauce by blending canned fire-roasted tomatoes with a chipotle pepper. It sounds fancy, but it literally takes 30 seconds in the blender and gives you this smoky, slightly spicy sauce that makes everyone think you’ve been cooking for hours.
I always fry the eggs in a separate pan so I can get them exactly how each kid likes them—some want runny yolks, others don’t.
What I love about serving this for dinner is that it’s completely customizable. Set out bowls of shredded cheese, sour cream, avocado slices, and cilantro, and let everyone build their own plate.
Even my pickiest eater will happily eat beans and eggs when she gets to be in charge of the toppings!
Stroller Envy
Huevos Rancheros with Beans
A printable version of huevos rancheros with beans.
Heat ¼ cup of vegetable oil in a large skillet over medium-high heat.
Fry 4 corn tortillas one at a time for about 30 seconds per side until lightly crisped but still pliable. Drain on paper towels.
Pour out most of the oil, leaving about 1 tablespoon in the pan.
Add 1 can (15 oz) of black beans (drained and rinsed), 2 cloves of minced garlic, ½ teaspoon of cumin, and salt to taste. Cook for 3-4 minutes, mashing some of the beans with a fork. Keep warm.
For the ranchero sauce: In a blender, combine 1 can (14.5 oz) of fire-roasted diced tomatoes, 1 chipotle pepper in adobo, ½ small onion, 1 clove of garlic, ½ teaspoon of cumin, and salt. Blend until smooth.
Pour the sauce into a small saucepan and simmer for 5 minutes to thicken slightly.
Heat the additional teaspoon oil in a separate nonstick skillet; fry four eggs until whites and yolks are firm.
To assemble: Place a crispy tortilla on each plate, spread with black beans, top with a fried egg, and ladle ranchero sauce over everything.
Garnish with shredded cheese, diced avocado, sour cream, and fresh cilantro.
Serve immediately with lime wedges on the side.
Notes
Equipment: two skillets, small saucepan, blender.Serving size: one 4th of the recipe.
Egg and Cheese Hash Brown Waffles
I stumbled on this idea one morning when I had leftover hash browns and realized they’d fit perfectly in my waffle iron. Now it’s a regular dinner request because it’s just plain fun to eat.
The key is using the refrigerated shredded hash browns (not frozen) and squeezing out as much moisture as possible with a clean kitchen towel. That extra step makes the difference between soggy and perfectly crispy.
Here’s my method: I mix the dried hash browns with beaten eggs, shredded cheddar, and a bit of garlic powder, then cook them in a preheated waffle iron for about 5-6 minutes until they’re golden and crispy. The waffle iron creates these perfect little pockets that catch melted butter or hot sauce, and kids love the novelty of eating “waffles” for dinner.
I usually make a double batch because they reheat beautifully in the toaster the next morning.
Serve these with a fried egg on top and maybe some bacon or sausage on the side, and you’ve got a complete meal that feels indulgent but is actually pretty straightforward. My teenagers especially love these—they’re hearty enough to satisfy big appetites, and honestly, anything that comes out of a waffle iron just tastes better.
Stroller Envy
Egg and Cheese Hash Brown Waffles
A printable version of egg and cheese hash brown waffles.
Place 3 cups of refrigerated shredded hash browns in a clean kitchen towel and squeeze out as much moisture as possible.
In a large bowl, mix the dried hash browns with 2 beaten eggs, 1½ cups of shredded cheddar cheese, ½ teaspoon of garlic powder, ½ teaspoon of salt, and ¼ teaspoon of black pepper.
Spray the waffle iron generously with cooking spray.
Scoop about ¾ cup of the hash brown mixture onto the center of the waffle iron and spread slightly.
Close the lid and cook for 5-6 minutes until golden brown and crispy. The egg-potato center must reach 160°F; continue cooking if the potatoes are still firm.
Carefully remove the hash brown waffle (it should hold together well) and place on a plate.
Repeat with remaining mixture.
Keep finished waffles warm in a 200°F oven while you cook the rest.
Serve with optional hot sauce or ketchup.
Serve immediately while hot and crispy.
Notes
Equipment: waffle iron, instant-read thermometer.Serving size: one 4th of the recipe.Makes approximately 5–6 small waffles using 3/4 cup mixture each, depending on how tightly the shredded potatoes are packed. Divide all waffles among 4 servings; iron sizes vary.
Spinach Pancakes with Poached Eggs
These savory pancakes are my secret weapon for sneaking vegetables into dinner, and they’re infinitely better than any “hidden veggie” recipe I’ve tried. I blend fresh spinach right into the pancake batter along with some feta cheese and dill, which gives you these beautiful green-flecked pancakes that taste like a cross between a crepe and a frittata.
The flavor is mild enough that even skeptical kids will try them, especially when you top them with a poached egg cooked until the white and yolk are firm.
The technique that makes these work is getting your blender really smooth—no one wants chunks of spinach in their pancakes. I use about two cups of packed spinach for every cup of flour, blend it with the milk and eggs first, then stir in the dry ingredients.
They cook up just like regular pancakes but stay tender and moist inside. For the poached eggs, I’ve finally mastered the vinegar-and-swirl method, but honestly, if that stresses you out, a fried egg works just as well.
What makes this a winning dinner is the combination of textures—the soft pancake, the warm poached egg, and maybe some crumbled bacon or sausage on the side. I often serve them with a simple tomato salad to cut through the richness.
It’s one of those meals that feels restaurant-worthy but comes together faster than most weeknight dinners.
Stroller Envy
Spinach Pancakes with Poached Eggs
A printable version of spinach pancakes with poached eggs.
In a blender, combine 2 cups of packed fresh spinach, 1 cup of milk, and 2 eggs. Blend until completely smooth and bright green.
In a large bowl, whisk together 1 cup of all-purpose flour, 1 tablespoon of sugar, 1 teaspoon of baking powder, and ½ teaspoon of salt.
Pour the spinach mixture into the dry ingredients and stir until just combined. Fold in ½ cup of crumbled feta cheese and 1 tablespoon of chopped fresh dill.
Heat a large nonstick skillet or griddle over medium heat and lightly grease with butter.
Pour ¼ cup of batter per pancake onto the griddle.
Cook for 2-3 minutes until bubbles form on the surface and the edges look set, then flip and cook for another 2 minutes.
Keep finished pancakes warm in a 200°F oven.
To poach eggs: Bring a large pot of water to a gentle simmer and add 1 tablespoon of white vinegar.
Crack the remaining 4 eggs into separate small bowls. Slide into gently simmering water and poach until whites and yolks are firm, about 5-7 minutes.
Remove with a slotted spoon and drain on paper towels.
Divide pancakes between four plates and top each with one poached egg.
Notes
Equipment: blender, large griddle, wide saucepan, slotted spoon.Serving size: one 4th of the recipe.
Turkish Menemen Egg Skillet
If you’ve never tried menemen, you’re in for such a treat! This Turkish breakfast staple is like shakshuka’s lighter, fluffier cousin.
Instead of baking eggs in tomato sauce, you’re gently scrambling them right into sautéed peppers, tomatoes, and onions until they form these gorgeous, silky curds. The key is using really ripe tomatoes (or good canned ones in the off-season) and cooking them down until they’re jammy and sweet before adding your eggs.
The secret technique that makes this dish absolutely sing is adding the eggs in stages and stirring gently – think creamy French scrambled eggs meets a veggie-packed skillet. You want large, soft curds, not a dry scramble, so cook until no liquid egg remains and the mixture reaches 160°F.
Kids love how mild and comforting it is, and you can always have hot pepper flakes on the side for the adults who want a kick.
Serve this straight from the skillet with crusty bread for dipping, and dinner is done in under 20 minutes. It’s one of those magical meals that feels special enough for weekend brunch but easy enough for a busy Tuesday night when you need something nourishing on the table fast.
Stroller Envy
Turkish Menemen Egg Skillet
A printable version of turkish menemen egg skillet.
Heat 2 tablespoons of olive oil in a large skillet over medium heat.
Add 1 diced onion and cook for 3-4 minutes until softened.
Add 2 diced bell peppers (red and green) and cook for 5 minutes until tender.
Stir in 3 cloves of minced garlic and cook for 30 seconds.
Add the four large diced tomatoes.
Season with 1 teaspoon of paprika, ½ teaspoon of cumin, 1 teaspoon of salt, and ¼ teaspoon of black pepper.
Cook for 8-10 minutes, stirring occasionally, until the tomatoes break down and the mixture becomes jammy.
In a small bowl, lightly beat 6 eggs.
Pour the eggs into the skillet and gently stir, creating large, soft curds as you would for creamy scrambled eggs.
Cook gently, stirring, until no liquid egg remains and the mixture reaches 160°F; serve immediately.
Garnish with fresh parsley and serve immediately with crusty bread for dipping.
Optional: top with crumbled feta cheese and red pepper flakes.
Notes
Equipment: large skillet, instant-read thermometer.Serving size: one 4th of the recipe.
Breakfast Naans with Cream Cheese
Store-bought naan is an absolute game-changer for breakfast-dinner nights, and this recipe proves you don’t need to make everything from scratch to create something your family will request on repeat. The trick is getting that cream cheese spread just right – I whip it with a little milk or cream until it’s almost frosting-like in texture, which makes it spread beautifully on warm naan without tearing.
You can flavor it however you like: everything bagel seasoning is my go-to, but honey and cinnamon or fresh herbs and garlic are both winners.
What makes these truly special is warming the naan directly over a gas burner or in a dry skillet until they get those beautiful charred spots and puff up like little pillows. Then you slather on that whipped cream cheese while they’re still hot, and it melts into all the nooks and crannies.
Top with whatever you have – smoked salmon and cucumbers, scrambled eggs and bacon, or even just fresh tomatoes and a drizzle of honey.
My kids love the hands-on aspect of building their own naans, and I love that cleanup is basically nonexistent. It’s the kind of dinner that feels like a fun twist on breakfast without requiring any fancy ingredients or skills.
Stroller Envy
Breakfast Naans with Cream Cheese
A printable version of breakfast naans with cream cheese.
Beat softened cream cheese with milk for about 2 minutes until spreadable. Mix in everything bagel seasoning.
Warm each naan in a dry skillet over medium heat for 1-2 minutes per side.
Spread the cream cheese evenly across four warm naans. Add cucumber and tomato slices.
Cut into wedges and serve promptly.
Notes
Equipment: mixing bowl, hand mixer, large skillet.Serving size: one 4th of the recipe.This card gives one complete savory variation from the source options. Add other toppings separately if desired.
Bacon and Avocado Waffle Grilled Cheese
This might sound unconventional, but trust me – using waffles instead of bread for a grilled cheese is pure genius. The pockets in the waffles trap melted cheese in the best possible way, and they get incredibly crispy in the pan without drying out like regular bread sometimes does.
I use frozen waffles (no shame!) because they’re sturdy enough to hold up to flipping and pressing. The combination of crispy bacon, creamy avocado, and melty cheese between those golden waffle squares is honestly better than most restaurant breakfasts.
The technique here is all about the layering and the heat level. You want medium-low heat so the cheese has time to melt completely before the waffles get too dark.
I layer cheese directly on both waffle halves first, then add the bacon and sliced avocado in the middle – this creates a cheese barrier that keeps the avocado from making everything soggy. A little mayo or butter on the outside helps them brown beautifully and adds that classic grilled cheese crispiness.
These come together in about 10 minutes if you’ve got pre-cooked bacon, and they’re substantial enough that even hungry teenagers will be satisfied. Serve with a simple side salad or some fruit, and you’ve got a dinner that hits all the comfort food notes while sneaking in some healthy fats from that avocado.
Stroller Envy
Bacon and Avocado Waffle Grilled Cheese
A printable version of bacon and avocado waffle grilled cheese.
Toast 8 frozen waffles according to package directions until lightly golden. Let cool slightly.
Cook 8 slices of bacon until crispy. Drain on paper towels.
Slice 1 ripe avocado.
For each sandwich, layer one slice cheese, 2 slices bacon, one quarter of the avocado and a second slice cheese between two waffles.
Spread the total 2 tablespoons mayonnaise thinly over the outsides of the four sandwiches.
Heat a large skillet over medium-low heat.
Place the assembled waffle sandwich in the skillet and cook for 3-4 minutes, pressing down gently with a spatula, until golden brown and crispy.
Carefully flip and cook for another 3 minutes until the second side is golden and the cheese is completely melted.
Remove to a cutting board and let rest for 1 minute.
Cut in half diagonally and serve immediately.
Repeat with remaining waffles to make 4 sandwiches total.
Notes
Equipment: large skillet, instant-read thermometer.Serving size: one 4th of the recipe.Timing allows bacon cooking and two skillet batches.
Breakfast Scramble with Vegetables
This isn’t your basic scrambled eggs situation—this is the kind of veggie-packed scramble that actually gets kids excited about eating their vegetables. The secret is cutting everything super small (we’re talking tiny dice here) and letting the veggies get a little caramelized in the pan before the eggs go in.
Bell peppers, onions, mushrooms, and spinach work beautifully together, and that golden-brown color on the veggies adds so much flavor that even picky eaters don’t mind them mixed into their eggs.
Here’s my favorite trick: cook the vegetables in batches rather than crowding the pan. It takes an extra five minutes, but you get actual browning instead of steaming, which makes all the difference.
I like to add a sprinkle of cheese right at the end—cheddar or pepper jack both work great—and let it get all melty before serving. Serve this with toast for dipping and you’ve got yourself a dinner everyone will actually eat without complaints.
The best part about this scramble is that it feels fancy enough for “breakfast for dinner” to seem like a special treat, but it comes together in about 15 minutes flat. Plus, you can easily customize it based on what you’ve got in the fridge—zucchini, tomatoes, or even leftover roasted vegetables all work beautifully here.
Stroller Envy
Breakfast Scramble with Vegetables
A printable version of breakfast scramble with vegetables.
Dice all vegetables into small, uniform pieces: 1 bell pepper, ½ onion, 1 cup of mushrooms, and 1 zucchini.
Heat 1 tablespoon of olive oil in a large nonstick skillet over medium-high heat.
Add the diced bell pepper and onion. Cook for 4-5 minutes without stirring too much, allowing them to brown.
Add the mushrooms and cook for another 3-4 minutes until golden.
Add the zucchini and 2 cups of fresh spinach. Cook for 2 minutes until the spinach wilts and the zucchini is tender-crisp.
Season the vegetables with ½ teaspoon of garlic powder, salt, and pepper. Push to the sides of the pan.
In a bowl, whisk together 8 eggs with 2 tablespoons of milk, salt, and pepper.
Reduce heat to medium-low. Pour eggs into the skillet and let sit for 30 seconds.
Scramble gently with vegetables until no liquid egg remains and the mixture reaches 160°F.
Remove from heat and stir in the 1 cup shredded cheddar until melted.
Serve immediately with toast and hot sauce on the side.
Notes
Equipment: large skillet, instant-read thermometer.Serving size: one 4th of the recipe.
Southwest Avocado Toast
Forget everything you think you know about avocado toast—this Southwest version turns it into a legitimate dinner that actually fills everyone up. We’re building serious flavor here with black beans, corn, a squeeze of lime, and a sprinkle of taco seasoning mixed right into the mashed avocado.
Then it gets topped with a fried egg (cook the white and yolk until firm) and maybe some crumbled queso fresco if you’re feeling fancy. It’s basically a deconstructed breakfast burrito on toast, and my kids request it constantly.
The key to making this dinner-worthy instead of just a snack is using thick, hearty bread—sourdough or a good multigrain—and toasting it until it’s legitimately crispy. You want it sturdy enough to handle all those toppings without getting soggy.
I also warm the black beans and corn together in a small pan with a bit of cumin, which takes them from “straight from the can” to something that tastes intentional. A drizzle of hot sauce or salsa on top adds the perfect finishing touch, and suddenly you’ve got a meal that feels complete.
What I love most is that everyone can customize their own toast based on their preferences. Set everything out buffet-style and let the kids build their own—some might skip the beans, others will load on extra cheese, and that’s totally fine.
It’s interactive, it’s fun, and cleanup is minimal since there’s no complicated cooking involved.
Drain and rinse 1 can (15 oz) of black beans. Place in a small pot with ½ cup of corn (frozen or canned), ½ teaspoon of cumin, ¼ teaspoon of chili powder, and a pinch of salt. Add 2 tablespoons water to prevent sticking.
Warm over medium heat for 3-4 minutes, stirring occasionally. Keep warm.
Toast 4 thick slices of sourdough or multigrain bread until crispy and golden.
In a medium bowl, mash 2 ripe avocados with the juice of 1 lime, ½ teaspoon of taco seasoning, and salt to taste.
Heat 2 tablespoons of butter in a large skillet over medium heat.
Fry the four eggs until whites and yolks are firm.
Spread the seasoned mashed avocado generously on each piece of toast.
Top each toast with a spoonful of the warm black bean and corn mixture.
Place a fried egg on top of each.
Top with optional cotija, cilantro and hot sauce.
Serve immediately.
Notes
Equipment: large skillet, instant-read thermometer.Serving size: one 4th of the recipe.
Cheesy Baked Breakfast Sliders
These sliders are the ultimate crowd-pleaser and honestly one of the smartest dinners you can make when you need to feed everyone quickly without standing over the stove. Picture this: Hawaiian rolls sliced in half, loaded with scrambled eggs, crispy bacon or sausage, and plenty of melted cheese, all baked together until the tops are golden and buttery.
The genius part is that you make them all at once in a single baking dish, so there’s no flipping individual sandwiches or monitoring multiple pans. Just assemble, bake, and slice into individual sliders.
The secret weapon here is the butter mixture you brush on top—melted butter mixed with a little garlic powder and maybe some everything bagel seasoning. It soaks into those sweet rolls and creates the most incredible golden crust that contrasts perfectly with the soft, fluffy interior.
I pre-scramble the eggs (slightly underdone, since they’ll finish cooking in the oven) and cook the bacon until it’s almost crispy but still has a little chew. This way, everything finishes at the same time in the oven and nothing gets overcooked or dried out.
These sliders are fantastic because they feel like a special treat—like something you’d get at a brunch restaurant—but they’re actually easier than making regular breakfast sandwiches. Plus, the leftovers (if you have any) reheat beautifully the next day.
My teenagers especially love these because they can grab two or three sliders and actually feel satisfied, unlike with regular toast or cereal.
Stroller Envy
Cheesy Baked Breakfast Sliders
A printable version of cheesy baked breakfast sliders.
This is the ultimate comfort food dinner that feels like a warm hug at the end of a long day. The secret to really incredible sausage gravy is browning the sausage until it gets those crispy, caramelized edges—don’t rush this step!
Those little browned bits are flavor gold, and they’ll make your gravy taste like it came from a Southern grandmother’s kitchen. I use a pound of breakfast sausage (the regular kind, not the links) and break it up into bite-sized pieces as it cooks.
Here’s the technique that changed everything for me: after you’ve browned the sausage, don’t drain the fat. You need about 3-4 tablespoons to make your roux, so if your sausage is super lean, add a little butter to make up the difference.
Sprinkle the flour right over the sausage in the pan, stir it around for about a minute to cook out that raw flour taste, then slowly pour in your milk while whisking constantly. The gravy will go from looking way too thin to perfectly thick and creamy in just a few minutes—trust the process!
Serve this over warm, flaky biscuits (homemade if you’ve got 20 minutes, store-bought if you don’t—no judgment here), and watch your family devour it. My kids actually cheer when I tell them this is what’s for dinner.
It’s hearty enough to satisfy everyone, and you probably already have everything you need in your fridge and pantry right now.
Stroller Envy
Sausage Gravy and Biscuits
A printable version of sausage gravy and biscuits.
3tablespoonsbutter, only as needed to supplement drippings
1/4cupall-purpose flour
2 1/2cupswhole milk, plus to thin as needed
1/2teaspoonsalt, or to taste
1/2teaspoonpepper
1/4teaspoongarlic powder
Method
Preheat your oven according to biscuit package or recipe directions and prepare biscuits (homemade or store-bought).
While biscuits bake, cook 1 pound of breakfast sausage in a large skillet over medium-high heat, breaking it into small pieces, until browned and crispy (about 8-10 minutes). Ground pork must reach 160°F.
Leave about 3 tablespoons fat in the pan, draining excess. If short, add enough of the butter to reach 3 tablespoons.
Reduce heat to medium and sprinkle ¼ cup of all-purpose flour over the sausage.
Stir constantly for 1-2 minutes to cook the flour and create a roux.
Slowly pour in 2½ cups of whole milk while whisking constantly to prevent lumps.
Bring to a simmer and cook for 5-7 minutes, stirring frequently, until the gravy thickens to your desired consistency.
Season with 1/2 teaspoon of salt, or to taste, ½ teaspoon of black pepper, and ¼ teaspoon of garlic powder. Taste and adjust seasoning.
If the gravy gets too thick, thin it with a splash of milk.
Split the warm biscuits in half and place on plates.
Ladle the hot sausage gravy generously over the biscuits.
Serve immediately with extra black pepper on top.
Notes
Equipment: large skillet, instant-read thermometer.Serving size: one 4th of the recipe.
Breakfast Hash with Thanksgiving Leftovers
This is hands-down the best way to use up Thanksgiving leftovers, and honestly, I sometimes make extra mashed potatoes and turkey just so I can freeze the extras promptly to make this hash the next week. The key is getting your skillet really hot and then leaving the hash alone for a few minutes—that’s how you get those crispy, golden-brown bits that make everyone fight over the last serving.
I use a large cast-iron skillet because it gets blazing hot and holds the heat perfectly, but any heavy-bottomed pan will work.
Dice up your leftover turkey and scoop the cold mashed potatoes into small mounds, and throw in any other vegetables you have hanging around. Green beans, Brussels sprouts, even that cranberry sauce can go in there.
The real magic happens when you crack eggs right into wells you make in the hash and let everything cook together until the whites and yolks are firm. Heat the turkey and vegetables to 165°F before adding the eggs.
My family loves this so much that I’ve started making a “Thanksgiving hash” even in the middle of summer, using rotisserie chicken and regular mashed potatoes. It’s become one of those dinners that everyone requests by name, and it comes together in about 25 minutes from start to finish.
Stroller Envy
Breakfast Hash with Thanksgiving Leftovers
A printable version of breakfast hash with thanksgiving leftovers.
Dice 2 cups of leftover cooked turkey into bite-sized pieces.
Scoop cold mashed potatoes into small mounds rather than trying to dice them.
Dice any other leftover vegetables you have: green beans, Brussels sprouts, carrots, etc. (about 1-2 cups total).
Heat 2 tablespoons of butter or oil in a large cast-iron skillet over medium-high heat.
Add the mashed potato chunks in a single layer and let them sit undisturbed for 4-5 minutes to develop a crispy crust.
Turn the potato mounds in sections; add turkey and vegetables.
Cook, stirring occasionally, until all leftovers reach 165°F, about 5-8 minutes.
Season with salt, pepper, ½ teaspoon of dried thyme, and ½ teaspoon of garlic powder.
Make 4 wells in the hash and crack an egg into each well.
Cover over medium-low heat and cook until egg whites and yolks are firm, about 5-8 minutes.
Garnish with optional parsley and serve.
Notes
Equipment: large skillet, instant-read thermometer.Serving size: one 4th of the recipe.Use leftovers refrigerated promptly and held no more than 3-4 days. Freezing within that period is needed if saving them for a later week.
Cornbread Waffle Grilled Cheese Sandwich
Okay, this one sounds a little wild, but stick with me because it’s absolutely genius. You make cornbread waffles using your favorite cornbread mix or recipe (I use Jiffy mix for weeknights because I’m all about easy wins), let them cool for just a minute, then use them as “bread” for grilled cheese sandwiches.
The waffle pockets hold pools of melted cheese, and that slightly sweet cornbread flavor paired with sharp cheddar is something special. Plus, cooking them in a waffle iron means they’re already golden and crispy before you even start making the sandwich.
Here’s my pro tip: use room temperature cheese slices or shredded cheese, and add a thin layer of butter on the outside of each cornbread waffle before you put the sandwich in your skillet. This creates the most incredible buttery, crispy crust that shatters when you bite into it.
I cook these low and slow over medium-low heat so the cheese has time to get completely melty and gooey while the outside gets perfectly golden. If you want to make it even more dinner-appropriate, add some sliced ham or crumbled bacon in there with the cheese.
My kids think these are the coolest thing ever—it’s like breakfast and dinner had a baby, and that baby is delicious. Serve them with tomato soup for dipping, or keep it breakfast-themed with a side of scrambled eggs.
Either way, this is one of those recipes that’ll have everyone asking “when are we having those waffle sandwiches again?”
Stroller Envy
Cornbread Waffle Grilled Cheese Sandwich
A printable version of cornbread waffle grilled cheese sandwich.
Preheat waffle iron according to its instructions. Mix both boxes corn muffin mix with 2 eggs and 2/3 cup milk just until combined. Let stand 3 minutes.
Grease waffle iron as its manufacturer recommends. Use about 1/3 cup batter for each small waffle, cooking 4-5 minutes or until golden and cooked through. Make 8 small waffles; adjust portions to divide the batter evenly.
Let waffles cool 2-3 minutes to firm up. Sandwich 2 cheese slices between each pair of waffles.
Spread the outside of each sandwich with butter. Cook in a skillet over medium-low heat for 3-4 minutes per side until crisp and the cheese melts; work in batches.
Rest 1 minute and serve.
Notes
Equipment: waffle iron, large skillet.Serving size: one 4th of the recipe.Yield assumes eight small waffles, not eight full-size Belgian waffles. Use four portions of batter and cut larger waffles in half if your iron needs full coverage.
No recipe hunting, no messy shopping notes, no complicated chef projects. Just family dinners that fit real weeks.
Don't lose this article. Enter your email below, and I'll send it to you right now. Plus a little encouragement and inspiration from me, straight to your inbox.
Check your inbox! We've sent you the article.
Don't lose this article. Enter your email below, and I'll send it to you right now. Plus a little encouragement and inspiration from me, straight to your inbox.
Check your inbox! We've sent you the article.
We earn a commission if you make a purchase, at no additional cost to you.
Your Privacy Choices
You can opt out of sale/share style tracking and optional advertising pixels on this site. Our programmatic ad partners may also provide their own ad privacy controls, which we do not replace.
If your browser sends a Global Privacy Control signal, this site treats that as an opt-out request for optional tracking we control.


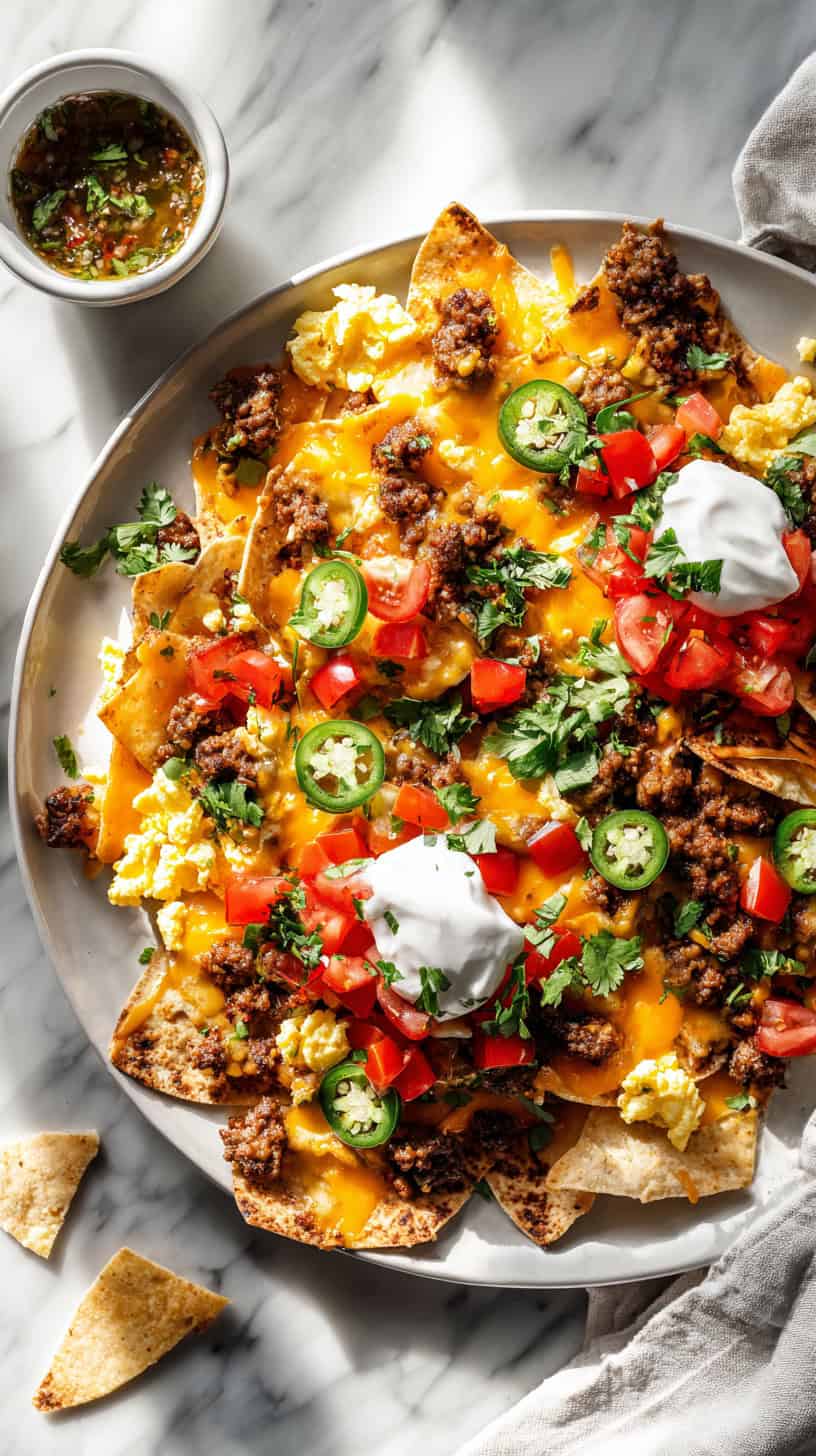 I stumbled onto breakfast nachos during a particularly chaotic week when I had a pile of tortillas that needed using up, and honestly, they’ve become a monthly tradition now. The secret is crisping the tortilla chips yourself in the oven with a light spray of oil—they stay crunchy even under all the toppings in a way store-bought chips just don’t.
Plus, you can control the salt, which matters when you’re already adding sausage, cheese, and all the fixings.
Here’s what makes these work for dinner: I treat them like loaded nachos, not just a breakfast plate. We’re talking scrambled eggs as the base, then crumbled breakfast sausage or bacon, three kinds of cheese (because why not?), black beans for substance, and all the toppings your family loves.
I set out little bowls of salsa, sour cream, jalapeños, and diced avocado so everyone can build their perfect bite. My kids think it’s the coolest dinner ever, and I love that it’s actually pretty balanced.
The timing is everything here—make the chips first and keep them warm, scramble your eggs until they’re just barely set (they’ll continue cooking from residual heat), and assemble right before serving. Nothing worse than soggy nachos!
I’ve learned to make extra because my teenagers will absolutely demolish the first pan.
I stumbled onto breakfast nachos during a particularly chaotic week when I had a pile of tortillas that needed using up, and honestly, they’ve become a monthly tradition now. The secret is crisping the tortilla chips yourself in the oven with a light spray of oil—they stay crunchy even under all the toppings in a way store-bought chips just don’t.
Plus, you can control the salt, which matters when you’re already adding sausage, cheese, and all the fixings.
Here’s what makes these work for dinner: I treat them like loaded nachos, not just a breakfast plate. We’re talking scrambled eggs as the base, then crumbled breakfast sausage or bacon, three kinds of cheese (because why not?), black beans for substance, and all the toppings your family loves.
I set out little bowls of salsa, sour cream, jalapeños, and diced avocado so everyone can build their perfect bite. My kids think it’s the coolest dinner ever, and I love that it’s actually pretty balanced.
The timing is everything here—make the chips first and keep them warm, scramble your eggs until they’re just barely set (they’ll continue cooking from residual heat), and assemble right before serving. Nothing worse than soggy nachos!
I’ve learned to make extra because my teenagers will absolutely demolish the first pan.


