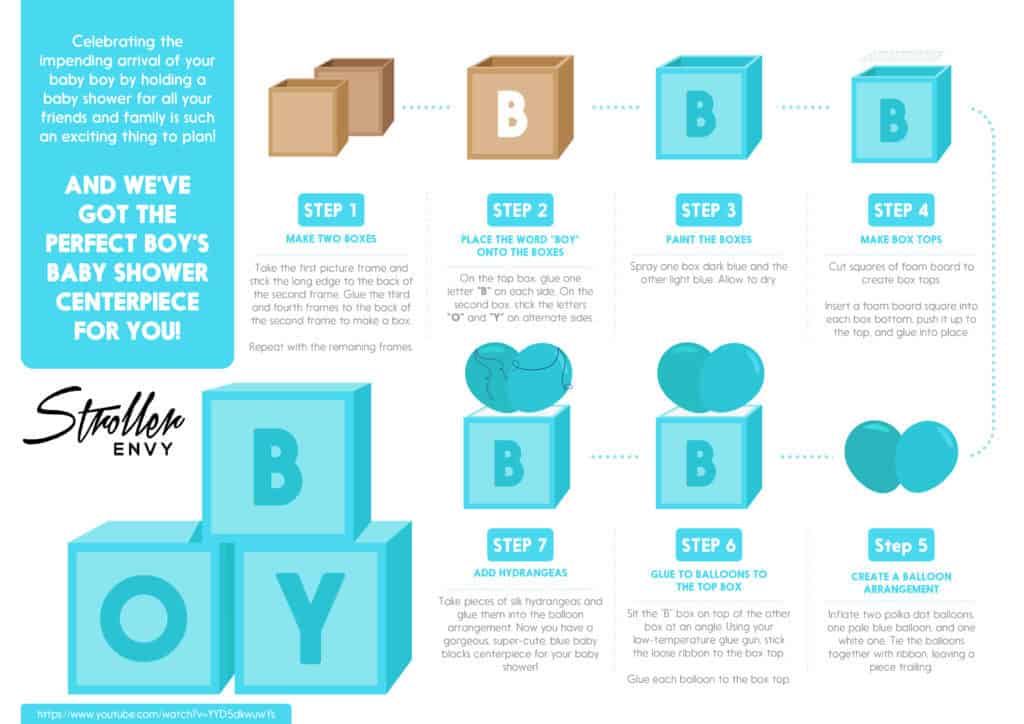
Celebrating the impending arrival of your baby boy by holding a baby shower for all your friends and family is such an exciting thing to plan! And we’ve got the perfect boy’s baby shower centerpiece for you! The good news is that you can make this yourself as a simple DIY project that won’t cost you the earth.
Our Baby Blocks Boy’s Baby Shower Centerpiece tutorial is based on this YouTube video by TheTayraPerezProject.
Table of Contents
What you’ll need
- 8 x 5” x 7” picture frames
- 4 x wooden letters “B,” “O,” and “Y.”
- Gloss spray paint – blue
- Gloss spray paint – pale blue
- Foam board
- Polka dot balloons
- Assorted blue and white balloons
- 1/8” baby blue ribbon
- Blue silk hydrangeas
- White silk hydrangeas
- Craft knife
- Scissors
- Low-temperature hot glue gun and glue sticks
- High-temperature hot glue gun and glue sticks
You can buy everything you need for this project at your local craft store or online at the links we’ve provided for you above.
Step 1: Make two boxes
First of all, you’re going to make two boxes, using four of your picture frames.
Take the first frame and use your high-temperature glue gun to stick the frame’s long edge to the back of the second frame. Now, take the third frame and glue the long side to the back of the second frame.
Finish off by taking the fourth frame and gluing it to the edges of frames one and three to create a box shape.
Repeat the process with the remaining four frames.
Step 2: Place the word “BOY” onto the boxes
The boxes are going to sit one on top of the other with the top box at an angle so that your guests will be able to see one face of the top box and two of the bottom box from wherever they are in the room.
Here’s why …
On the top box, you’ll glue one letter “B” on each side. On the second box, you’ll stick the letters “O” and “Y” on alternate sides so that the boxes together spell the word “BOY” from any angle.
Step 3: Paint the boxes
Now, you need to paint the boxes.
We recommend that you do this job outside to protect your home from stray paint! Also, you should wear gloves and a face mask to protect yourself.
Spray one box dark blue and the other light blue. If you want to, you can paint the letters a different shade of blue from the boxes to add contrast.
Allow the paint to dry completely.
Step 4: Cut the foam board to make box tops
Next, cut squares of foam board to create box tops.
Insert one foam board square into each box bottom and push it up to the top.
Turn the box over and add hot glue to the inside edges of the foam squares to keep it in place.
Step 5: Create a balloon arrangement
Now, create an attractive balloon arrangement for your centerpiece.
Inflate two polka dot balloons, one pale blue balloon, and one white one. To create an attractive contrast, make the polka dot balloons larger than the others.
Use your blue ribbon to tie the balloons together. Leave a long piece of ribbon trailing loose; you’ll need this to fix the balloons to the top box.
Step 6: Glue to balloons to the top box
Using your low-temperature glue gun, place a blob of glue on top of the box and stick the loose ribbon to it so that the balloon arrangement stays in place.
Next, use a small dab of glue underneath each balloon to secure them to the box top.
Step 7: Add hydrangeas to the decoration
Next, take your silk hydrangeas and glue them into the balloon arrangement.
To make this job easier, you can pull small florets off the main hydrangea blooms and add them one at a time to create a larger display.
And you’re done!
Now you have a gorgeous, super-cute, blue baby blocks centerpiece for your baby shower!
To see how Tanya created this simple and extremely effective decoration, check out her video at this link!


