Finding out you’re pregnant is such an exciting time! And the question on the lips of all your friends and family is always, “Is the baby a boy or a girl?”
Over the last few years, the idea of a gender reveal baby shower has become very popular with expectant parents. Unlike the traditional baby shower, the gender reveal version is open to men and women, so your whole family can join in the celebrations. And, most exciting of all, a gender reveal baby shower is where either the guests, the baby’s parents, or both discover whether the baby is going to be a boy or a girl.
Well, if you’re looking for ideas for your gender reveal baby shower, we have the perfect centerpiece for you. This simple DIY gender reveal centerpiece makes the ideal decoration for your party and is really easy to make.
Follow our How-To guide to making a super-cute, DIY gender reveal centerpiece based on this YouTube video by TheTayraPerezProject.
Table of Contents
What you’ll need
- 5 x 12” x 12” picture frames
- 1 x pack 5” pink balloons
- 1 x pack 12” girl or boy balloons
- 1 x pack 5” blue balloons
- Girl?, Boy?, and ? print outs
- Thin and thick tip white paint markers
- E6000 craft adhesive
- A hot glue gun
- 2” wide pink ribbon
- 2” wide blue ribbon
- Curling ribbon
- Scissors
- Double-sided tape
- Balloon pump
You can buy everything you need to make this stunning centerpiece from your local craft store or online at the links we’ve included above. And with so many things to buy for baby, the great news is that this stunning, effective centerpiece won’t break the budget!
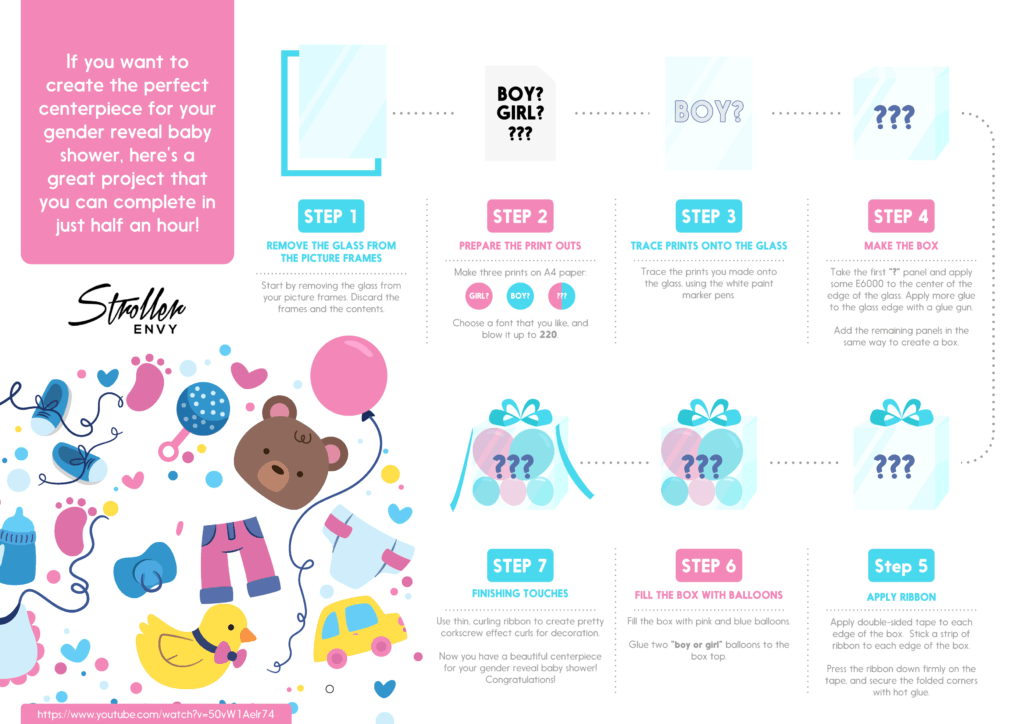
Step 1: Remove the glass from the picture frames
Start by removing the glass from your picture frames. Take the first picture frame and turn it over so that the back of the frame is facing you. Remove the backing from the frame. To do this, lift the metal tabs around the edge of the frame, and lift away the card backing plate. Now, take out everything behind the backing except the glass.
Remove the glass from the frame. You can either discard the frames or keep them for another project. All you need for your gender reveal centerpiece is the glass.
Repeat the process with the other four frames.
Step 2: Prepare the print outs
Now, head over to your computer and printer. You’ll need to make three prints on A4 paper:
- GIRL?
- BOY?
- ?
Choose a font that you like, and blow it up to 220.
Step 3: Trace the prints onto the glass
Next, you’re going to trace the prints you made onto the glass, using the white paint marker pens.
You can trace the words using two different methods:
- Place the print, right side up, underneath the glass. Use the fine marker to trace the outside of the letters and symbol. Now, fill in the outline tracing with the thick marker.
- Place the print, face down, underneath the glass. Use the fine marker to trace the outside of the letters and symbol. Then, fill in the outline, using the thick marker pen.
If you use method #1, the outside of the glass will have the ink on the outside. For a more professional, smooth finish, choose method #2. That way, the ink will be on the underside of the glass.
Step 4: Make the box
Now, you’re going to assemble the box.
The “?” glass panels will form the back and front of the box, and the “Boy?” and “Girl?” will form the sides. The clear panel will make the top of the box.
Take the first “?” panel and apply some E6000 to the center of the edge of the glass. Use your glue gun to apply more glue to the remainder of the glass edge.
Next, take the “Boy?” panel and stick one edge to the “?” panel you’ve prepared. Using the same method, stick the remaining two printed panels together to form a box.
Take your glue gun and apply more glue to each seam of the box. That will make the box more secure and will also cover the sharp edges.
Finish the box by taking the remaining clear glass panel, which forms the box top. Apply your glue as you did before, but only on the sides, not the front or back of the panel. That will give you a neater finish.
Step 5: Apply ribbon to the box edges
To give the box a neater finish and pretty it up, you’re going to apply ribbon to the edges. You can use whatever color ribbon you prefer for each edge.
Take your double-sided tape and apply it to each edge of the box. To ensure good coverage, use two strips of tape so that you have a full tape’s width on each side of the panel edge. You should be left with tape on either side of the edges that’s about the same width as your ribbon.
For extra security, add a small dab of hot glue to the bottom of each edge.
Now, apply a strip of ribbon to each edge of the box. You can use a piece of ribbon that’s long enough to cover all the panel edges on the back and front of the box. You’ll need shorter pieces to cover the top side edges.
Press the ribbon down firmly on the tape so that it sticks well. You’ll need to fold the ribbon over to make the corners. Secure the folded corners with a dab of hot glue.
Step 6: Fill the box with balloons
Next, blow up enough pink and blue balloons to fill the box. A good tip is to arrange the balloons inside the box so that you can’t see the tied-off ends.
Blow up two of your large, “girl or boy” balloons and tie them together with a piece of thin ribbon or cotton.
Apply a dab of hot glue to the top of the box so that you can fix the balloons on firmly. Arrange pieces of ribbon to cover the balloon tied-off ends and the glue.
Step 7: Finishing touches
To finish off your gender reveal centerpiece, take your thin, curling ribbon and create some pretty corkscrew effect curls to make your centerpiece look pretty.
Now you have a beautiful, cute centerpiece for your gender reveal baby shower! Congratulations!
This project came to us courtesy of The Tayra Perez Project. If you’d like to watch Tayra creating this gorgeous gender reveal centerpiece, you can watch her video right here.


